Showing posts with label Performance Bike Shop. Show all posts

Tuesday, March 12, 2013

Ultegra 6700 Hub: Near Death Experience

Last fall my back wheel, the expensive, custom built one, developed an annoying creak. It's an Open Pro Mavic Rim attached to an Ultegra 6700 rear hub via 14/15 butted DT spokes on the drive side, and 14/17 super-butted spokes on the NDS.

After spending hours trying to relieve the spokes, and generally driving myself nuts trying to remedy the creak, I gave up and put my nearly identical spare on, and have ridden that the last 8 months. A couple of months ago though, I realized it was time to get ready to replace my "winter" wheel with my summer wheel, and decided to repack the bearings on both in the process of swapping them out.

Parts replaced were 5,6,8,9, and 10,11,12,13. Photos are of #10's cup surface. BTW, part #11 has an allen wrench internal engagement area for removal.

I was shocked to find both cups and cones on the drive side pitted and spalled on my spare wheel, (purchased from PBS at a huge discount). I realized that since it was my spare, and having few miles on it, I had NOT repacked it in 2 years, as it still had factory grease in it. This was either an appalling factory lubrication failure, and/or, a serious QA problem for Shimano. I really have no idea where the blame lies, but you will note there is micro-pitting and a bit of rust all over the cups.

Pitting and spalling of an Ultegra 6700 rear hub


It's important to understand that normally for loose ball bearings, a pitted cup has no remedy,and the hub is ruined - garbage to be hurled into the trash can in disgust. For Shimano hubs (and many others), there is one exception though, and that's the drive-side cup in back, as the cup is actually part of the free-hub body, and is NOT pressed into the hub as all the other cups are, both with front and rear hubs. (the other side of the cup is a cone for the internal free-hub bearing - pretty clever)

 I took the good free-hub body of my creaky, custom wheel, the axle with 2 good cones, and was able to put together one good wheel by cannibalizing two bad ones. There's definite advantages in having two identical, or in my case, nearly identical wheels (the PBS wheel uses 14/15 double butted Wheelsmith spokes on both sides). Since rear wheels are much more likely to break than front ones, having two identical rear wheels is much more important. Think about relative tire wear in the front and back, and double or triple that.


I ordered a new free-hub body from Amazon, and a new cone from Performance Bike Shop, who happen to remember they're a LBS, and should provide this service. They did so after a complete failure the first time (they lost all record and recollection of the order, until I jogged their memory, and then they just shrugged), 6 weeks of waiting, and then a week waiting for the re-order. When I went to pick the drive-side cone up, they informed me they couldn't sell just one - in clear contradiction to the two cones, each with their own part number, plastic bag, and price. I HATE being lied to!!!

$20, plus tax for the two cones, and $45 for the free-hub body. I'd RX getting the 2 cones along with the axle in a rebuild kit for $30 - a better deal IMHO. $65 is a lot of money to put into rebuilding a hub that didn't cost much more than that when I bought it, but the alternative was to toss the entire wheel. Nasty thing, having a nice wheel wrapped around a bad hub. In fairness to PBS, the 2nd mechanic I dealt with was very professional.

I'll see you on the dark side of the moon. Very hard to photograph. These are the best of 100+ attempts.

 When the parts came I mounted them on the custom wheel, resigned to having an expensive creaky wheel for all my trouble, but still a spare. I'm not sure if it was the new free-hub, the RnR process, the new cones, new balls, or Teflon grease, but the creak is GONE!

I now have 2 good wheels, assuming I don't find anymore nasty surprises when I repack my winter wheel, and I have replaced the stock bearings, which have G20 balls, with G10 balls I bought in bulk from Amazon.com. Btw, balls are rated according to their tolerances, so the smaller the number, the tighter the tolerances, and therefore, the better the balls. G10 is as good as steel bearings get. You can get G5 ceramic balls, and that is an advantage in having loose ball hubs. Generally though, my enthusiasm for loose balls has dissipated significantly. ;)

This looks like a spectacular grease failure. I think this was factory grease. I packed the new bearing with pure Teflon grease spread on the cups and cones, and then packed full with Finish Line grease with "some" Teflon in it. I assumed since it contained Teflon, it would be compatible with pure Teflon grease. It's usually a bad idea to mix greases. 


This brings me to an important point. If you have cartridge/sealed bearings, (a misnomer, as all bearings have seals) you don't have to worry about the cups getting pitted or spalled. You replace the cups, cones, balls, and seals whenever you replace the cartridge bearing. The downside is, you're paying a lot of extra money for parts that aren't usually needed, so for any given price point, you get better quality bearings in a loose ball hub, AND, you can get them. Chris King, for example uses his own in-house mfg-ed sealed bearings - which he doesn't sell to the public.

Close to what I've been using, which I purchased at $120 an oz from an aerospace contractor, so it's MIL-Spec. This should work just as well for 1/6th the cost. Spread in zig-zag pattern across the ball path on the cups and cones before packing with the grease below to hold the balls in place while placing them in the cup. The very best grease for preventing spalling is 100% Teflon grease. Hard to find.
Good, basic bearing grease for bikes. Basically, I use it as a filler to displace water and dirt, and let the pure Teflon do the work of keeping the bearings rolling.

There's nothing very hard about replacing or repacking ball bearings, nor free-hub bodies. It pays to swap your wheels out at least once a year, and at least repack them. The G10 balls are going for a dime a piece at Amazon. There are 18 in back and 22 in front. Well worth the trivial expense in my view.

Morningstar Ball Tweezers
Highly recommended is a constant tension ball tweezers. They hold the ball with a constant force, which you relieve when you want to release the ball. This guarantees you don't scratch the ball by squeezing it too hard. It also makes holding the slippery little devils much, much easier, and allows you to press the balls into a cup's grease pack, which will hold the balls in place until you can place the axle and cone to keep them from falling out.

This one has a brass ball holder, which makes scratching a ball impossible. These are tools mechanics treasure. A source of bragging rights for those who know how easily balls can get scratched. When working with bearings, every attempt should be made to maintain a surgically clean environment. A human hair mixed in the grease, speck of dirt, metal fleck, or bit of rubber seal will degrade and/or ruin a bearing. It is absolutely essential that your tools, hands, rags, and general work area be absolutely CLEAN!

I am happy to report that the creak is gone, so almost worth the $65 bucks. Now I can focus on building up a new speed wheel in back, based on my old Alex wheel hub, DT Swiss bladed spokes, and a DT Swiss R585 30mm deep rim. With 24 spokes, and the 30mm profile, it should be slippery, and since the Alex hub is pretty light, a reasonable weight as well.

Friday, July 20, 2012

FAIL Whale: Performance Bike Shop

I have been waiting to post the R&R of my broken Shimano 6703 shifters for Performance Bike Shop to complete the exchange - which they have FAILED to do.

Out of frustration, after 7 weeks, I took the duplicate set of shifters they sent me to the local store and asked them to credit my card. Because the item was over $100 they FAILED to do so. This after waiting 8 days for a snail-mail that was supposed to contain a Fed-X label for the return - the 2nd such label has FAILED to materialize.

After 9 days, I called the local store, and they have FAILED to receive any indication my package was returned to PBS's return center, or resulted in a refund.

It is very apparent to me that Performance Bike shop is on the ropes financially. There are a few indications of this. 1st, and foremost, any healthy company would have a functional CRM software system in place by now. PBS's system seems to be ancient, and badly broken. After a half-dozen extended phone calls, and a store visit, NOTHING is in any system anyone at customer service can find back. This is beyond pathetic.

By contrast, Amazon.com had good CRM in place by the 2nd yr of their existence, and currently handles all returns completely online, printing both the return authorization and mailing label on your printer so you can ship the package back, with complete confidence it's being tracked, and everyone knows the complete history of both ends of the transaction at all times.

The other indication PBS is on the ropes, is they've dropped a lot of vendors, and my guess is, the remaining ones are having to finance PBS's inventory.

Finally, their prices are no longer the best. Amazon can usually meet or best their price, and offers free shipping and no taxes to boot. The tax treatment is something PBS can do nothing about, but even ignoring that, PBS no longer is price competitive. My guess is, Amazon has pushed them to the brink, and they are going down.

The local PBS guy asked me to wait another week. After that I'm going to call my card company and take my money back. I'm beyond disgusted with these nit-wits.

UPDATE: 7/ 26/2012

I got a call from the shipping manager (the person who I hand-delivered the redundantly shifters to on 7/11) at the local Fair Oaks Performance Bike shop on Monday the 23rd, in response to inquire on Thurs the 19th.  Nothing.

I called today, Thur the 25th, 2 weeks and a day after returning the shifters, and talked to the sales manager. Nothing. Promised they would escalate the matter with the store manager tomorrow and call me back after I threatened to have my credit card company revoke the charge, and/or call the local TV stations. Beyond pissed off!!!

UPDATE: 7/27/2012

Got a call from the shipping manager at noon today. The return package was received on the 24th, but only after burning up a lot of phone line were the local shop people able to find this out. I wasn't entirely satisfied until I found my credit card had been credited. So 7 weeks after this debacle started I've saved $339, minus the shipping that PBS failed to reimburse me for. Draw your own conclusions. I think I'll pay a little more and get a real guarantee in the future.

.

Sunday, November 27, 2011

Winter Wrenching Daze

These cold, gray, overcast skies are the perfect time to lose motivation to ride, but doing my annual maintenance on the bike always motivates me. I also like riding in the cold once I get out there and get warmed up, so all I really need is a reason to get out there.

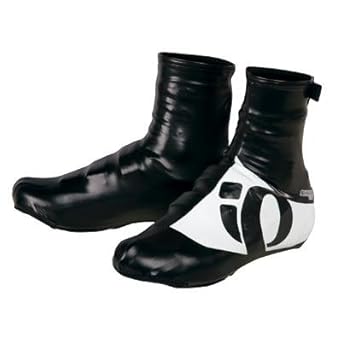
With the cold night riding I've been doing, especially with SBH, I broke down and bought some "cheap" PI, Barrier Lite shoe covers to wear over my SpaceBlanket foot warmers. They look great, but the SpaceBlanket is doing all the work.
Very shiny, but with the bold, and hi-viz graphics, you don't have to guess about which is R and which L. Touted as being water repellant, rain shy, or perhaps, just scream in muted tones when attacked by raindrops.

The new 6703 front derailleur I ordered at Performance Bike Shop on the 8th, finally arrived yesterday, so I drove over and picked it up. Not sure if I save much on shipping, as gas is pretty expensive too, so may be doing most of my shopping on Amazon.com in the future.

They are building new warehouses like mad, and happy to say, many things that were sourced from 3rd parties, are now shipping from Amazon proper - which still has better quality, return, and shipping policies than most 3rd parties.

As for PBS, 20 days to ship a derailleur? Are you kidding me? Also sick of "sales" where the prices are all jacked up at 11:45 the night before. A sleazy way to do biz, and the prices never quite return to prior levels after the sale.

I'm spoiled by my SRAM chains having quick links, so I was a little miffed I had to get my chain tool out to break the DuraAce chain in order to get the old derailleur off last night (and now can't find the special case-hardened pins back, arrgghh).

I took the opportunity to clean the chain in a half dozen rounds of Simple Green and hot water in a heavy glass jar, very well shaken. I broke the first jar, probably because I didn't have distilled water to work with, and the hot water was a little too hot, but, in the end, I was able to clean it pretty thoroughly.


DuraAce chain. Extensive machining, but crap metalurgy
While the shifting performance of the DuraAce chain is excellent, all of the machining on it makes it  hard to clean, but more disturbing, was the corrosion on the chain. It looks like the zink-alloy plating is thin, and is peeling off. Because the Shimano drive train shifts so well, this chain hasn't spent any time "trawling" or grinding, so the level of wear is hard to understand.

The chain uses hollow pins, which I like, as they hold a small oil reserve, which keeps the chain from squeaking for much longer. Ditto for the SRAM hollow pin chains. I'm going to take a fresh look at the SRAM chain, and will probably go with that next time. It's more expensive, but I hope it will wear better, and since worn chains prematurely wear cassettes and chainrings, it's important to run the best possible chain.

I also noticed that the DuraAce chain has 4, count them, 4 different varieties of links, and I was only looking at the outside of the female plates (DuraAce chain has an inside surface and an outside surface for better shifting, in addition to the inside and outside, or male and female links all chains have).

Maybe after the earthquake Shimano is, or was, scraping the bottom of the barrel to find links, but this is not a great confidence builder. I'm also going to take another look at the Wipperman stainless chain. Stainless 300 should be 2-3X harder than 4130 CroMo, which I assume is what Shimano is using. BTW, I went with DuraAce instead of Ultegra because I heard nothing but bad about Ultegra durability.

Some American company should OWN the chain biz. We have the raw materials, technology, market size, and distribution system to beat any and all competitors. Hard to understand why the industry is so dominated by foreign parts. At least Wheelsmith is still making spokes here. Now if they would just make the butts taper instead of ramp. Eddy won't even use the WS 14/17 spokes on 3-cross spoking. Too many failures on the hub side where the spokes have to bend around each other sharply.

I will also be replacing my FSA Gossamer bottom bracket as soon as it, and the tool to install it, arrive in the mail. With the drive train so pulled apart I'm going to start with it completely clean, so will be pulling the cassette apart and cleaning that too. I'll either just use a clean rag or Simple Green and an electric brush. I'd normally replace the balls and repack the bearings on the wheels too, but I just did that two months ago, so will wait til spring for that, although my mtb hubs could benefit from new G10 balls.

In the meantime, I have been setting up my SS conversion to ride at night, which means putting together another saddle bag, adding lights, a Garmin mount, and finding a strap-on water bottle cage. A key element for a seat bag is a good alloy shank bit driver, and some high quality hex bits in 2.5,4,5,6, Phillips #1, and flat #4. The bits go in the hollowed out handle. I add a 1/4" ratcheting open-end wrench for torquing on things like chainring bolts, and have a complete toolkit that is lighter and much more flexible than those grotesque multi-tools.
Made in tool heaven. AKA Germany
 A key part of this one was the Wiha bits I bought. Made in Germany, and the official tools of BMW and Mercedes shop mechanics, the quality is phenomenal. They come in a nice plastic case, which is why I bought a 2nd set for wrenching at home. If I'm going to hump this stuff over 4,000 miles and 250,000ft every year, I want it to be absolutely reliable.

I've also been looking for a high quality 1/4" ratchet, and found Grainger is selling Proto tools, now owned by the Stanley cheap Chinese crap tool importers. The Proto ratchet is about $45, made in America, and will outlast me.
Proto J4749XL - 1/4" Drive Standard Length Full-Polish Ratchet
Why spend this kind of money on tools? Because life is too short to work with crap tools. They slow you down, waste your time, are frustrating to use, and when tools fail you, it's always at the worst possible moment, and often there are no good alternatives.

My father had about $65,000 in tools at one time, and started buying Snap-On, MAC, and Proto when his impact wrenches started shattering Sears Craftsman sockets left and right. Although guaranteed, he got tired of spending an hour a day driving to Sears and back to replace tools. Even though his tools were over 30 yrs old, they still brought about 60% of their replacement cost at auction. If you have kids, good tools make a wonderful, enduring legacy you can pass on. Besides, guys don't do jewelry, they do tools.

Also worth mentioning, my 2nd MagicShine showed up, and I put it up on my helmet the same day. I also found a nice lens that is supposed to spread the beam on the handlebar light out horizontally, but not waste light shining up into space. It was a $5 purchase, so we'll see how that goes, but I expect to have animals coming back out of hibernation riding with 2,000 lumens and 3 taillights. Now if it would just warm up a bit....

.

Friday, May 6, 2011

Techie Tuesday: Podium Ice Waterbottles

I decided to get Tuesday out of the way early to make time for the upcoming holiday - St Insanity Day! lol 

I first noticed the CamelBak bottles because of the bite valve, which self-seals when left open. It makes drinking out of a bottle much easier on really steep climbs, because you don't have to open and close the bottle, it's done automatically.

I'd also say, the valve is much softer, so a lot less chance for a fat lip, on a bad bump. At 21oz the Podium bottles are just a little smaller than the 24oz Polar bottles, but easier to squeeze (especially when cold), and once the valve opens, the squirt stream is 3-4X the volume.


I've been waiting for these Podium Ice bottles to show up at the local Performance Bike Shop, as they are listed online, and while looking in vain today for another jersey, I found them in stock. Sitting right next to these ZeroLoft insulated bottles, was another new offering from CamelBak called "The Big Chill" - a full 25oz bottle. Unfortunately, those did not use the new Aerojel insulation. (and why not ???)


I started using the CamelBak Chill bottles prepping for my 2nd, and successful attempt on Mt Hamilton as part of the Canyon Classic ride in 2009. It's also why I'm interested now, as I would like to do the unofficial "Super-Century" version of the CC, where you do the Mt Hamilton route, return to the little village of San Antonio, and then join the regular Century course where the two parted company. That should make for 11-12k of climbing and 155 miles. I only have 7 weeks to train for it though.


I currently have one bottle cage on my downtube, which I lowered one hole (the bottom hole is tied with a vinyl tube clad zip tie), and two via a Profile Designs aero bottle rack (I reviewed it extensively for Amazon). I notice it's now available in white, which I would definitely get, as it helps make you more visible at night with your taillight reflecting off of it. It might help keep the bottles cooler too. (why has no one made an insulated bottle HOLDER yet???)

Having 3 X 25oz bottles gets you into the CamelBak hydration pack range without having that weight on your back and butt all day, so this is interesting. (but, why not the best insulation ???)  The shape is also more aerodynamic, and easier to pull out of the bottlecage than a Polar bottle. Anyone need some well-maintained Polar bottles?

While we're on the subject of stuff you put on your seat post, I just have to give a shout out to the gorgeous ToPeak RX BeamRack carbon fiber rack. It weights less than 13 oz, and even with the small bag mounted, weights just 32oz. It's so beautiful I just want to buy one and hang it in my living room. Tons of bag options for their slip-on mounting system too.

 I'd spend the money for a good seat post though. Something like the Syntace P6 carbon fiber (sold out everywhere!), not the total POS Easton stuff I have. I can't see it in the pic below, but the photographed rack is actually mounted on a Syntace P6!

This system would make Centuries, Double Centuries, hot, thirsty summer, and cold winter ride starts SO much more manageable. Would the Profile Designs waterbottle rack fit around this? I think so on my compact frame. Those side panels unfold into full side panniers on some models. Pretty sweet system!


Oh, just to wrap up this review of seatpost mounted stuff, I'm really liking my Specialized Romin Elite Gel saddle. The extra padding of the gel is something I NEED - along with the 153 width.

Saturday, February 5, 2011

Black Days

Woke up a few days ago with Sound Garden's "Black Days" running through my head. My mood was even blacker. Four weeks on I shouldn't be so tired and hurt so much. Turns out I was right. My dentist appointment turned up a molar in bad need of some TLC. Root canal and 2 weeks of antibiotics, but a week into the meds my energy level is much better. Didn't think a broken bone should be kicking my butt that bad.

About that. I happened to be looking at the X-Rays again and noticed there is a scale ruler on the bottom of the straight-on film. Based on that, the longitudinal break was almost 4" long. That's a lot more bone surface to heal up than a clean snap break (with two very sharp edges that caused all the bleeding seen in the bruising), so pretty happy it's been healing up well the last week, and I've gotten a lot of my mobility back. I can even interlace my fingers above my head - and it feels good too.

Will have to pull the back wheel off the bike this week and take it to Mad Cat to get the kicked spoke replaced. Find myself looking at the Performance Bike Shop spam I get emailed, so probably be riding again by the time the Pro teams show up to practice for the Amgen Tour of California again this year.

It's going to be the best one yet, with some super tough stages. The one I'm thrilled about will be stage #2 from Lake Tahoe to Sacramento. That's about 7,000 ft downhill. Don't know what the course is yet, but AFAICT, I-80 is the only way down in parts, so look for a scorching fast stage.

I enjoyed myself a 2-day grunge-fest, after which my spirits were much better, and like the song says, "I sure don't mind the change".

Monday, November 8, 2010

Spare me the .....

After taking nearly 2 weeks off to rest, I had a rather weak ride last Wednesday. There was only one short stretch where I felt my legs were under me. I would have been really disappointed, except I have noticed that while my 1st ride back is typically weak, my 2nd is typically epic.

Friday's ride was no exception. In fact, except for the ride I did hopped up on Claritin in April, the average power in watts set a new PB at 257 for the entire 1:45 minute ride. Sans the warm-up leg to Sunrise via Bannister Pk, average HR was 145 - so ~ 1:30 minutes at LT.

I was a bit late thinking to lean into it on the Beals Pt climb, but still got within 15 seconds of my PB. In short, it was an epic ride from start to finish and my legs felt like thunder and answered every call. AWESOME!!!

I met a guy up at Beals, Jean Claude, who is from the Virgin Islands. That, of course, got us to talking about Tim Duncan, power forward for the San Antonio Spurs, the most dominant forward in the NBA for most of the last 10 years. He's also from the Virgin Islands, and only started playing basketball because a hurricane destroyed the swimming pool he used to train in.

It turns out, Jean Claude used to swim in that same pool, and is now very interested in getting into cycling to get his cardio mo-jo back. A really refreshing conversation, and he was all smiles that someone knew where he was from, and something about his homeland. I am hoping he shows up at Meetup.com as I promised him I'd lend him my freshly rebuilt steel steed if he wants to go riding together. Before I shoved off I fixed the brakes on his daughter's bike. Simple, for an old mechanic like me, but greatly appreciated nevertheless.

It's such a great feeling to make someone feel - welcome!

---

I got a killer deal on some new Sidi shoes from Competitive Cyclist (great size selection too)  As a bonus, I got a 20% off coupon for any clothing item, which I am going to apply to a water-resistant rain shell. Nice!

I'm not riding with them yet, because I forgot they don't come with cleats - pedals come with cleats. Duh! It does, once again, bring up the importance of having spares for the many, many things required to ride your usual ride.

I found the Shimano cleats I needed at Amazon, which not only had the best price, but free shipping. I also ordered a spare Garmin mount for my Edge 305, as those have a bad reputation - one well-deserved in my experience - for having the retaining clip break off at the tab, making it impossible to remove the unit from its mount without an ice-pick or small screwdriver.

I also picked up a spare Vredestein Fortezza rear tire for my spare rear wheel, on sale at Performance Bike Shop for  $29 (front wheels almost never fail, and if you ride very long you'll find yourself slowly collecting extra front wheels as you tend to buy wheels in sets, and the front one always outlasts the rear one - more on this tomorrow), and a half-dozen spare tubes as I was down to my last spare. You should always have 3 tubes on hand - 2 in your bag when riding in winter, and one at home.


I say in winter for two reasons. First, because while you can stop and wait for help, doing so for very long invites hypothermia - a serious threat in winter (always carry a SpaceBlanket in winter). Second, because when roads get wet in winter, tires get wet, and that attaches very sharp sand pebbles to tires which burrow their way through the tire and pop it. On wet days the race mechanics at the TDF replace the team's tires after a single day. Better bring a pump instead of a CO2 cartridge too, as I have found glueless patches VERY unreliable.

TMMV, depending on where you are, how much you ride alone, the length of your rides, and how tolerant of mechanicals your club members are, but certainly, at least at home, a spare set of brake pads, cables, 10ft of cable housing, 2 extra boxes of handlebar tape, a half dozen spokes of the correct length, at least 1 spare tire, 1 spare roll of Velox rim tape, a dozen or so spoke nipples, elastic HR monitor strap, oh, and shoes.

In general do an inventory of what you put on and depend on when rolling out the door, and buy spares for those. More spares if you call around and your LBS doesn't carry them - the the Garmin mounts. Oh, that reminds me, when I get the rain gear from Competitive Cyclist, I need to get a spare ratchet and strap for the shoes. Those are NEVER in stock at your LBS. Buying spares ahead of time, on sale, can save you a lot of grief and money.

Wednesday, October 27, 2010

Techie Tuesday - Wheels & Wheels of Details

My spare rear wheel arrived at the local Performance Bike Shop - shipped free of charge from the online store - in good shape, but with a 100mm front skewer instead of a 130mm skewer. I walked around the store and picked up a few items, especially, a new pair of gloves, squeezing the spokes to relieve them, and then handed the wheel back to the mechanic to have it trued.

It was in pretty good shape, so I am very happy with the purchase, as the cost was a screaming deal at $118 - about half of $205, plus shipping, from Colorado Cyclist. In their defense, my CC wheels were custom built by hand with DT Swiss's Revolution, 14/17 super-butted spokes, so I expected to pay more for them. The PBS wheels use double butted 14/15 Wheelsmith spokes, which as you will see in the photos, have much more abrupt butts. Spokes with abrupt butts usually fail at the butt, if and when they fail.

As indicated a few posts back, the CC wheel has developed a serious flaw at the SUP weld, so the catalyst for buying the PBS wheel was as a spare I can use to keep riding while my CC wheel gets shipped back for a warranty inspection.

I took a lot of pics to get these, which I think are quite good, and highlight contrasts between these two wheel builds. I went through a lot of trouble to get some good shots of the manufacturer's trade-mark stamp on the spoke heads. Once you know what to look for, this makes identifying the spoke mfg quick and easy.

Without further adieu then...


Sorry there are no captions, but BlogSpot's captions currently screw up the HTML so badly that you lose the ability to click on the pics and get full-resolution click-throughs..

Pic #1: Note the prominent "W" stamped on the spoke head for Wheelsmith, the manufacturer. Also, if you look closely you will see the butt area quite distinctly about 30mm out from the spoke head. The transition is done in about 4-5mm.

You might also notice a characteristic of 3-cross spoking - that adjacent spokes are pulling in opposite directions and form an almost unbroken and unbent line from one side of the rim to the other. This arrangement limits stresses on the flange to those pulling along the curve of the flange, nearly eliminating forces pulling away from the flange directly towards the rim. (which is characteristic of radially spoked wheels)

Pic #2: Shows a close-up of the flange and spoke head.

Pic #3: Shows a shot along the drive-side of the wheel, with the halographic Mavic OpenPro decal in focus.

Pic #4: Shows the same shot, but with the Shimano Ultegra 6700 steel freehub body in focus. You can see the butting quite clearly on several of the spokes in this shot.

Pic #5: Shows the DT Swiss head stamp and the very tapered butting. It is very hard to see the butting, it is so gradual. It is easier to feel it, but you can see it somewhat here, and the butting is all over by about 20-25 mm from the head. The same is true on the nipple side, leaving almost the entire length of the Revolution spoke at a very thin 17 gauge.

Pic #6: Shows a close-up of the head stamp and flange.

Wednesday, September 15, 2010

Techie Tuesday

Aesthetic, but not much to look at from this side - except the crank arm pin at the top that tells you how to align the 5 holes, and keeps the chain from getting jammed between the crank arm and outer ring.

You can also use this pin to get a feel for where in the pedal stroke the shifts are planned. The first shift-pin is 5 teeth back from the crank arm pin. Double cranks have their 1st pin 7-12 pins back. Note too the chainring bolt holes are counter-sunk so the bolts can directly bear torque forces.

Color is gray, despite my halogen lamp's insistence it's bronze.
Flip it over, and a world of marvels awaits you as you try to figure out how many ways all of the pins and ramps and ramp-lettes, will bend your chain to give you instant shifts. However it works, it works well!

More pins and ramps than you can shake a chain at!

It's a triple outer, and clearly stamped 52-39-30. This defines the angles the pins and ramps are designed for
I'm running 52/38/28 for now, but it looks like that is not different enough to create a problem. In fact, the 38T seems to drop the chain off onto the 28T in a way that the chain fits onto it's teeth without having to slip back to sync up.

Extensive machining and pinning make for instant shifts
An edge view showing more relief on the pins and ramps
Torx-30 aluminum FSA nut and bolt - left. Steel allen nut and bolt - right.
I broke one of the FSA bolts, tightening it without even holding a wrench on the nut, and it's clear why. The FSA nut has to devote almost half of the threaded area of a traditional nut to an engagement area for the Torx-30 driver. The FSA bolt is thus much shorter. The traditional system has the bolt go all the way through to the end of the nut, so a lot more threads can be used to tighten down the chainrings.

Add to that the inherent weakness of aluminum and it's understandable why one of the bolts broke in half. I felt lucky there was enough Torx engagement left to be able to get the broken piece out of the nut. The replacement bolts were $2 at Performance Bike Shop.

3 chainrings, 3 colors. Thank you Shi-follow marketing mavens
To get the nuts out, you have to pull the crank off, unbolt the 74BCD granny, and then turn the screws out of the bolts. Tedious, as the chain is always dirty and it has to go somewhere while you're working on the crank and chainrings.
52T from Japan, 38T from France, 28T from USA. I expect to be invited to the UN any day now!
A well-behaved mutt!
I will probably replace the TA Alize middle ring with a Shimano 6603 39T soon. The 28T is a Salsa I've been meaning to put on for 6-8 months, and this seemed like a good time. It is BEEFY! A good thing in a granny, because at 28T there aren't many teeth pulling when you are stomping and torquing up a hill, and that means they wear out fast and start exhibiting chain suck.

PS: I'd like to dedicate this post to my father, one of the best mechanics who ever held a wrench. Thanks for all you taught me. Miss you pop. Wish you were here.

Thursday, August 12, 2010

Summer's Slumber

It was 5:00 and 75 degrees yesterday. Yes, this is August in California. I checked my calendar twice just to be sure! So why wait for late when there is so much yummy cool air out there?

Taking up this theme I headed out the door ~ 5:30 and decided to have me an unstructured ride. OK, if you know anything about me by now, it's that I don't really do unstructured, but this came pretty close to it. I didn't air up the tires. I didn't eat first, and my route was made up of turns that called out to me as I approached them.

I ended up down at Guy West Bridge, mostly curious about the progress on the construction, and I was encountering a pretty stiff headwind of cool air and runners. I'm talking about in the hundreds. I guess Fleet Feet was putting on a practice run for an upcoming event. Anyway, it was pretty interesting, and somewhat entertaining to see all the peeps out running along both sides of the trail.

I chowed down on a PowerBar at the picnic table under the bridge, smiling and waving as runners of all skill levels trudged, floated, or something in-between, passed me, pushed along by the breeze. When I tried to clip in and shove off though I found both sides of the trail clogged with runners. Hummm, what to do. How about get out in the middle and clip in right quick?

Seemed like a reasonable decision, at least until one of the 'runners' gliding through the double S turn happened to be on a bicycle. :-O  I tried to get real skinney, right there in the middle on the road-kill line, but knew I'd be screwed in a few seconds as there was traffic coming in both directions that couldn't see me for the S turn.

Luckily, the woman on the bike behind slowed way down and used mental telepathy to indicate to me I should clip in, and right quick, before she fell over from doing .000001mph. Well, the seas parted, nobody crashed, and happy to report, no runners were harmed in the making of this post!

I caught up with the angel who spared me from road-kill-dom in a few hundred yards, and hung back just enough so I didn't suck on her wheel too much. We had a pretty good tailwind, but we were still only riding at 17-19mph. At some point she got down in her aerobars (the view from behind improved dramatically at that point :) and picked up the pace a little, so I cooled my jets and hung back.

Finally I could tell she was tiring, so I pulled abreast of her and we chatted for a minute before I told her it had to be my turn to pull by now. She said she didn't think she could keep up with me, but I assured her I was trying to take it easy and put in some longer miles, so I'd go slow enough. I did, for about a mile, but when I got to Watt Ave she was nowhere in sight.

It was such a nice day to ride, and I had plenty of time, fuel and water, so I rode right past WBP and on towards Sunrise. Didn't want to stop at Sunrise either. Although it was close to sunset by then, (there's a song in all this "Sunrise, Sunset" somewhere) I made the right turn for Hazel, and kept going.

At Hazel I turned right onto Gold Country for a block or so before turning into the long series of parking lots and connecting roads that comprised the recent detour used while the new retaining walls were being built last month. Less wind, less traffic, nice surface, what's not to like? Oh, and the new front brake pads are wearing in perfectly! A nice buttery feel with a great progressive pull.

Shortly after rejoining the ARPT, dropping into the aerobars (gear up, flaps up, full throttle), and hitting the power, who should I spot on the other side of the trail than my new friend on her beautiful white LiteSpeed. I made sure she wasn't in need of AAA or anything, and pushed off. It was getting late. I wish now I had gotten her contact info because we're close enough we could ride together, and she at least would really benefit from riding with a faster rider. Oh, well. Maybe another day.

I peeled off for Bannister Park and returned home with daylight to spare. Nice ride. A little over 30 miles, but a collection of waypoints I haven't gathered into a ride before. I just love that with the ARPT there just seem to be an endless number of permutations that make for interesting rides, and interesting people.

PS: More friends with broken back wheels. This time Forte, which is Performacebikespeek for 'Crap' to be sure, but still more evidence that most factory-built wheels will last 1-3 years for 170+lb riders. The replacement choice was Mavic Aksium. We'll see how long those last, if that was the right choice, and if I made the right decision going with custom OPs.