Showing posts with label Mavic Aksium. Show all posts

Wednesday, October 12, 2011

Techie Tuesday: Single Speed Conversion

I've been a bit at a loss at to what to do with my old friend, the Nishiki Competition I bought while attending UC Berkeley in the spring of 1980 at the Missing Link (the shop is still open btw, and being run as a Co-Op) I have so many wonderful memories attached to this bike, but without downtube braze-ons for shifters, nor water bottle bosses, bringing it up to modern bike standards is difficult, and, seems somewhat unnatural. Better to have it a vintage bike with vintage equipment.

Me & Tea & Nishiki, halfway up Monitor Pass, circa 1982
After following a single speed bike from the Aquatic Center up to Folsom, and hanging onto his wheel with considerable effort, we had a very productive conversation about what his conversion entailed. All of those missing frame bits my bike doesn't have, he had to cut off, and mine does have the all-important horizontal rear dropouts, so important for adjusting chain tension.
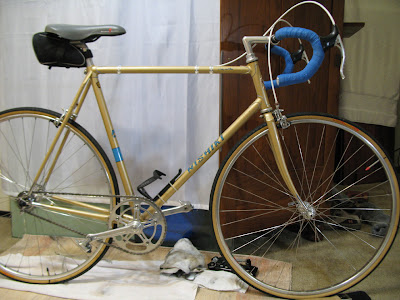
Nice, clean look. SunTour Supurbee brakes are an exact Campy copy circa 1985. Cleaned, treated with Naval Jelly to arrest rust, and all steel parts treated in hard parifin wax and Canola oil at ~ 400 for 20 minutes. Bontrager brake pads were the only ones that fit.
Excess Technologies California freewheel, SunTour horizontal dropouts, and donor mtb skewer with toothy surface to keep the axle planted under load
Ofmega sealed bearing hubs by Campy, circa 1985, Wipperman 3/32nds stainless chain, and perfectly straight chainline between 120mm dropouts. The latter makes replacement skewers hard to come by.
Pristine Campy 52T big ring, turned inside-out and moved to the inside postion on the Sugino SuperMighty 135 BCD, 5-bolt crank. Very rare SPD aero racing pedals.
Big ring clearance is only ~ 4mm. Tight, but makes for a wonderfully tight chainline.
Just love the clean look, and tight chainline. Still have all the original decals intact

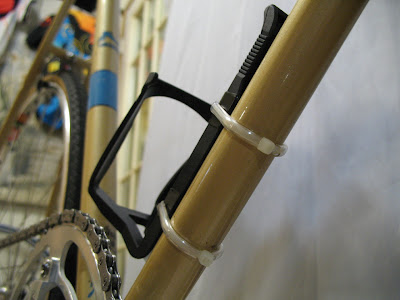
Zip ties covered with vinyl tubing do a great job holding the bottle cage in place with the help of a strip of sticky rubber from a tail light mounting kit.
Street legal with cage and borrowed saddle bag. Just love the very clean, track bike lines on this. Handbuilt, 36 spoke wheels feature Mavic rims and Ofmega hubs. Campy BB, Omas alloy headset, and Laprade seatpost. Rear brake cable housing clamped to toptube using vinyl-coated zip ties.
 Last week it was raining, and a perfect opportunity to pull the trigger on a SS conversion, so after mulling it over for days, I got out the wrenches just after midnight, and stripped all the gearing off, sans the 6-speed Regina freewheel, which I didn't have the tool for.

The next day I went to MadCat on Marconi, and had them pull the freewheel off, check the sealed bearings on the Ofmega hubs (made by Campy in 1985), and mount an Excess Technologies California 19T freewheel. The bearings were in perfect condition, and I chose the freewheel because it felt smooth, and was chromed head-to-toe on the outside - important for a foul weather bike.

Carmichael Cycles had the special shorter crank arm bolts needed for running just 1 chainring, took the 42T inner ring off, moved the pristine 52T Campy big ring inside, and flipped the face to the inside to match the stub bolts. The crank is a Sugino SuperMighty, an exact replica of a Campy Record crank of the same vintage, and has 135 BCD rings, as expected. If the 52T hadn't been so pristine, and if Campy 135 BCD weren't so expensive, I probably would have gone with the usual 46T or 48T front ring.

As Sheldon Brown's site mentions, moving a full-sized big-ring to the inside position isn't always possible, because the chainring will often hit the chainstay. In my case I have about 4mm of clearance, and that is very close, but enough. It's important to keep in mind that static clearance isn't the litmus test. Go mash up some hills and make sure the frame flex isn't going to allow the chainring to rub.

You'll also need to extract, or cut the crank arm chain block pin off of the chainring, as it will be turned towards the frame once flipped around. In my case, turning it round and round with a small ViceGrips did the trick nicely, but I was a bit disappointed that the beautiful Campagnolo stamp on the face of the ring ended up turned in, and is now only visible from the "ugly" side of the bike.

With the crank all set up, and the rear wheel adorned with the new freewheel, I moved the micro-adjusters all the way back in the rear dropouts and started cutting chain. Without a derailleur you have to get the chain length almost perfect, and 19/52 is a little hard to fit to my bike's chainstay length. I cut the chain a half-dozen times, and ended up with kind of a half-link by using the Wipperman quick link to bridge between 2 male ends.

The Wipperman chain is 3/32", and once I settle on the gearing, I'm going to switch to a Wipperman Inox 1/8" chain. It's stronger, new, and the extra width should allow sand and grit to fall off the drivetrain, extending its life.

I used vinyl tubing encased zip ties to lash a waterbottle onto the downtube, and pulled the saddle bag off my Roubaix, and headed out the door for a short 15 mile ride. There are a lot of roller between me and the ARPT, some with grades of 7-8%. Coming back from WBP though, there is one short hill that is just over 9% grade. I was worried about that, and found a longer, flatter route just in case. I'd ridden the detour in 52/16 gearing, so knew I had a good out if I needed it.

The ride to the ARPT was a lot of fun. I worked a little harder, but loved the sound of the freewheel whirring away on the downhills, and got a good glute workout, standing and mashing up hills. The 57cm frame has a lot more cockpit room than my 54cm Roubaix, and that is definitely helpful when climbing out of the saddle.

Once on the bike trail I started ramping up the spin. Nothing intentional, it just happened, and soon I was spinning close to 90 rpms. Next thing I knew I was into a headwind, and down in the drops to shed some wind. Nice! The 52/19 was just perfect for the climb over the WBP bridge, and after pulling my bottle and taking a long draw of GatorAid I felt strong heading home.

Approaching the decision point, I decided to turn right and try mashing up Sara Court's 9% grade. With fresh legs under me if I couldn't do it now, I sure wouldn't be able to do it when tired. I got a little run at it and just managed to mash up to the top, impressed at how stiff the frame was. Stiffer than I remembered it being.

Coming home on California, with its badly broken and mangled surface, I was also surprised that the fork soaked up bumps so well - better than my carbon bike I think. I must be due entirely to the extra weight, as that fully-sloping crown is very stiff.

I have ordered a freewheel removal tool and a 17T freewheel, bought a new bottle cage, and need to repack and tighten the bottom bracket, but all in all, this was an easy conversion. I am looking at fenders and moving the Roubaix's pedals over, so still a few details to attend to, but this really makes the most of this bike. It's clean frame, horizontal dropouts, and low end Tange 4130 CroMo tubing just make this conversion feel so right. Riding this bike again is just pure joy. So many memories we've shared together ride with us.

Monday, September 12, 2011

Techie Tuesday - Optimal Wheel Spoking

This is a post I have wanted to do for months and months, and never seemed to find the time. I was motivated to do the post now because disk brakes are taking off for Cyclo-Cross racing, and Johan Bruyneel has been calling for at least rear disk brakes being used in the TDF to cut down on crashes caused by carbon wheel lockups. I happen to agree there.

While a rear-only disk wheel will not impact road wheels that much, front and back disk wheels would make radial spoked wheels disappear in a heartbeat. It would also introduce all of the torque-bearing considerations to the front wheel as are present in rear wheels.


Mid-1980s 36 hole low-flange hub with very little tear-out protection. Even laced 3X, the spokes have a significant concave path across the wheel. Note that on all 3X lacing, adjacent spokes pull in the opposite direction, offsetting each other's stresses on the flange.
Mid-1980s rear low-flange hub. The larger flange, relative to the front hub, creates a flatter, more optimal spoke path across the wheel.

Ultegra 6700 32 hole low-flange front hub laced 2X. The spoke path is even more concave than the 36 hole 3X spoking above. Better than radial, and with extra material to prevent tearout, it nevertheless is NOT warranted for radial spoking.
Ultegra 6700 32 hole low-flange rear hub laced 3X. Spoke path is very close to straight across. If they're ever made available in Ultegra 6700, 28 hole hubs should produce optimal 3X spoking.
Mavic Aksium: Drive-side spokes run perfectly straight across the wheel, the optimal 90-degree pulling angle for a torque-bearing spoke, from LR corner to UL corner here. Well done.
Mavic Ksyrium: A tribute to pig-headed stupidity and marketing arrogance. The beautiful convex spoke path on the non-drive side is completely negated by the use of radial drive-side spoking. The decision to use aluminum spokes, with no fatigue limit, guarantees failure.
These two wheels, identical in all other respects, show the difference a larger diameter rim makes on spoke path. As you can see, the 29r (~700c rim) spoke path isn't quite as optimal against tear-out as the 26r's is, although both are very good.
WTB Mtb 26r: Convex spoke path on 3X spoking, from LL to middle R on drive side and LL to UR on disk brake side here.
WTB Mtb 29r: Slight concave path from LL to UR on drive side, and LR to UL on brake side here.
The 24 hole drilling and 3X spoking creates straight-across path on the drive side. Uses a Hi/Lo flange strategy to make the wheel respond more symmetrically
Perfect straight-across spoking, which Mavic calls R2R (rim to rim) on their Cosmic Carbone all-carbon wheels. They must have fired some marketing people and hired some engineers.
  A few notes on ferrous (steel) and non-ferrous (aluminum) metals. The curves look like this. Note that 6061-T6 fatigues down to only 10% of original strength with symmetrical, oscillating, mean-zero stresses, and to only 4% with maximum asymmetrical stresses.

This textbook on metal fatigue spells it out much more starkly - non ferrous metals have no real fatigue limit. They fatigue to zero strength. Still think those Ksyrium spokes broke because you abused them?


As I remarked on before, drive-side spokes are tightened to about twice the tension of those on the non-drive side in an attempt to shore up the drive side's lateral strength. There are several strategies available to mitigate the resultant asymmetrical way the wheel responds to axial and lateral loads. In general, the goal is to have the spokes of the two sides yield equally with any applied stress, such that the effect on rim movement and deflection is symmetrical.
  1. Radial spoking on the ND. This shortens its spokes, making them less elastic. Ironic that NDS radial lacing is used by mfgs who lace the front wheel radially to make it stiffer. The NDS is already too stiff visa-vie the drive side.  It also makes for a harsher ride, and precludes it from bearing any torque.
  2. Use of a larger flange on the drive side. This moves the spoke bed outward, improving its angle, and can be helpful. It also bears torque better. It will also improve the spoke path, shorten those spokes, and thereby, stiffen them. 
  3. Low (or very low) flange on the NDS. Effectively moves the spoke bed inward, and lengthens the spokes. Most helpful when combined with 3X lacing and thinner spokes to increase elasticity. 
  4. Using more spokes on the drive side. This is rare, but it has the potential to soften up the NDS so the wheel responds more symmetrically to loads. One interesting option here is to use radial lacing and only populate every other hole. Fewer spokes would be more aerodynamic.
  5. Heavier gauge spokes on the drive side. This was my personal choice, as I used 14/15 on the drive side, and 14/17 on the NDS. This makes for a rock solid wheel that is also supple.
  6. Using a smaller freehub body, as found on Hope and Chris King single-speed hubs, and mount only 6-7 gears of a cassette. You'll have fewer gears, but a much stronger wheel. This idea is getting some traction in the mtb community. With a triple crank adequate gears are still available.
  7. Off-center spoke drilling. Velocity's O/C rims can move the spoke bed over 4mm. It should help, especially if combined with other strategies. This directly attacks the problems of dishing a wheel.
  8. Move the NDS flange inward. Disk brake rear wheels do this routinely. It usually results in a wheel that is laterally weak on both sides. Measure the flange to flange distance and buy accordingly.  Wider is better.
  9. Use heavier spokes only where they are pulling torque. These would be trailing spokes on the drive side, and with disk brakes, leading spokes on the NDS. With caliper brakes and 28 hole drilling, only 7 spokes would have to be 14/15, all the other spokes could be 14/17. This should keep spoke weight to ~ 100 grams.
 
White Industries H3 road hub with titanium freehub body. 252 grams. Note the hi/lo flange strategy.
Tune MAG 150 weights only 150 grams. Note straight-pull zero-flange on NDS and large flange on drive side.

    Thursday, August 12, 2010

    Summer's Slumber

    It was 5:00 and 75 degrees yesterday. Yes, this is August in California. I checked my calendar twice just to be sure! So why wait for late when there is so much yummy cool air out there?

    Taking up this theme I headed out the door ~ 5:30 and decided to have me an unstructured ride. OK, if you know anything about me by now, it's that I don't really do unstructured, but this came pretty close to it. I didn't air up the tires. I didn't eat first, and my route was made up of turns that called out to me as I approached them.

    I ended up down at Guy West Bridge, mostly curious about the progress on the construction, and I was encountering a pretty stiff headwind of cool air and runners. I'm talking about in the hundreds. I guess Fleet Feet was putting on a practice run for an upcoming event. Anyway, it was pretty interesting, and somewhat entertaining to see all the peeps out running along both sides of the trail.

    I chowed down on a PowerBar at the picnic table under the bridge, smiling and waving as runners of all skill levels trudged, floated, or something in-between, passed me, pushed along by the breeze. When I tried to clip in and shove off though I found both sides of the trail clogged with runners. Hummm, what to do. How about get out in the middle and clip in right quick?

    Seemed like a reasonable decision, at least until one of the 'runners' gliding through the double S turn happened to be on a bicycle. :-O  I tried to get real skinney, right there in the middle on the road-kill line, but knew I'd be screwed in a few seconds as there was traffic coming in both directions that couldn't see me for the S turn.

    Luckily, the woman on the bike behind slowed way down and used mental telepathy to indicate to me I should clip in, and right quick, before she fell over from doing .000001mph. Well, the seas parted, nobody crashed, and happy to report, no runners were harmed in the making of this post!

    I caught up with the angel who spared me from road-kill-dom in a few hundred yards, and hung back just enough so I didn't suck on her wheel too much. We had a pretty good tailwind, but we were still only riding at 17-19mph. At some point she got down in her aerobars (the view from behind improved dramatically at that point :) and picked up the pace a little, so I cooled my jets and hung back.

    Finally I could tell she was tiring, so I pulled abreast of her and we chatted for a minute before I told her it had to be my turn to pull by now. She said she didn't think she could keep up with me, but I assured her I was trying to take it easy and put in some longer miles, so I'd go slow enough. I did, for about a mile, but when I got to Watt Ave she was nowhere in sight.

    It was such a nice day to ride, and I had plenty of time, fuel and water, so I rode right past WBP and on towards Sunrise. Didn't want to stop at Sunrise either. Although it was close to sunset by then, (there's a song in all this "Sunrise, Sunset" somewhere) I made the right turn for Hazel, and kept going.

    At Hazel I turned right onto Gold Country for a block or so before turning into the long series of parking lots and connecting roads that comprised the recent detour used while the new retaining walls were being built last month. Less wind, less traffic, nice surface, what's not to like? Oh, and the new front brake pads are wearing in perfectly! A nice buttery feel with a great progressive pull.

    Shortly after rejoining the ARPT, dropping into the aerobars (gear up, flaps up, full throttle), and hitting the power, who should I spot on the other side of the trail than my new friend on her beautiful white LiteSpeed. I made sure she wasn't in need of AAA or anything, and pushed off. It was getting late. I wish now I had gotten her contact info because we're close enough we could ride together, and she at least would really benefit from riding with a faster rider. Oh, well. Maybe another day.

    I peeled off for Bannister Park and returned home with daylight to spare. Nice ride. A little over 30 miles, but a collection of waypoints I haven't gathered into a ride before. I just love that with the ARPT there just seem to be an endless number of permutations that make for interesting rides, and interesting people.

    PS: More friends with broken back wheels. This time Forte, which is Performacebikespeek for 'Crap' to be sure, but still more evidence that most factory-built wheels will last 1-3 years for 170+lb riders. The replacement choice was Mavic Aksium. We'll see how long those last, if that was the right choice, and if I made the right decision going with custom OPs.

    Sunday, November 22, 2009

    Road Trip!


    Well, after a lot of research, and soul searching, I found a solution to my broken wheel. I am getting a pair of 2010 Mavic Aksium (axiom) wheels from Cambria, and will be driving up to Santa Rosa to pick them up as I just can't see paying $50 shipping for $250 wheels. They reassured me the price in the store for the pair of wheels will be $220 and tax, so it's worth the drive.

    Mavic has taken a lot of weight out of these wheels over the last 2 years - at least 200 grams - there are no bendy J-hook spokes, and those straight spokes are bladed aero spokes. These entry level Mavic wheels are now within 25 grams of the much more expensive Ksyrium Equipe, so Mavic is responding to the world-wide recession by offering riders a very good wheel at a great price.

    I have some concerns about durability due to my "185 lb" weight (that's my story and I sitting on it), but online reviews report these wheels to be pretty bomb-proof. If I were hard on my gear I  wouldn't risk it, but I'm not, so this will be a pretty big upgrade from the $40 Alex wheels the bike came with. (it seems like the more decals, the cheaper the wheel)

    In the meantime I intend to ride my mtn bike, which is long overdue for a good outing. Unfortunately, I sprained my left ankle, which, in conjunction with a (nicely healing) right calf tear has me picking my day rather carefully.

    I missed a great mud-fest on Friday out at Lake Natoma led by my friend Marsh Wildman, but that left ankle I almost ripped off my leg sticking the nose of my snowboard at ~ 35mph 2 yrs ago, and with the weather adding to the misery index, it really hurt on Friday.

    Speaking of the calf, it seems to be getting stronger still, and the ankle sprain has helped in that I no longer am favoring it. I now stand on my tip toes to get things like canned pumpkin for Thanksgiving down from the top shelf in the kitchen. I'd be lying though if I said I wasn't getting frustrated by the lack of riding. I think it's time to head to the gym and get some core in. Cheers!

    Saturday, November 14, 2009

    Dead Weels A'rollin

    I went out the door for a quick ride Thursday, noticing at the last moment how little time I had left before sundown. Intending to head off to Beal's Point, my bike kind of went right instead of left at the Sunrise 'Y' , so I ended up heading downstream to William Pond Park. It was a nice day with a 5-7 mph headwind and I picked up a trailer somewhere around Hagen Park.

    I felt slow and sluggish, so when he passed me I let him go a bit and then realized he'd pretty much spent himself getting around me, so I bridged up and rode his wheel for awhile. We ended up riding up over the WBP bridge side by side carrying on a nice conversation.

    I was feeling a lot better by then - all the rust was falling off and I had some snap in my legs - so I decided to head downstream to CSUS. Doug bailed about a mile down from WBP, but I put in a plug for HammerinWheels and hope to see him again on a club ride.

    I picked up the pace, hunkered down in the aeorbars, and tried hard to slice through the the wind while keeping the sweat from dripping off the tip of my helmet and spattering all over my glasses. I was blowing hard as I rode up the long ramp to the Guy West Bridge at CSUS. Amazing how much of a lather I can work up in 60 degree weather at 20 mph.

    Eager to trade in the headwind for a tailwind, I hit the Garmin's lap button and pushed off 5 minutes later. I set a pretty solid 22-23mph pace and passed a half-dozen riders along the way. As usual, I got no challenges along this section, so I had to focus on my Garmin and kept pushing myself till my HR monitor would alarm and then back off after a minute or two.

    After passing a fast commuter with rear panniers filled, I put on a sprint to keep him off my wheel. No point pulling the kitchen sink. Just as my HR alarm settled back down I ran up onto the back of the mythical Park Ranger SUV (it exists, really, I swear!) doing a very proper 15 mph - the legal speed limit on the ARPT.

    If anybody actually observed that speed limit the bike trail wouldn't be much use to anyone, but there he was, stuck in my face anyway. I should have peeled off the trail for surface streets at the edge of the WBP park, or at least hit the lap button, but as it was I ended up crawling along behind him and ruined my average.

    Once home I found I had spent about 50% of the ride in Zone 5 - low Zone 5, fortunately. I often ride the hardest going downhill or with the wind at my back. Speed begets speed.


    Last night I was cleaning and prepping my bike for a ride tomorrow from Auburn to Foresthill - a nice climbing route - and decided to finally Scotchbrite my rear wheel's braking surface clean to get the undulation out of the rear brake. I was shocked to discover a spoke breaking out through the rim, splitting it in the process.


    This is not a welcome expense, with winter clothes and Christmas to budget for, but at least I didn't end up sprawled all over the road coming down a 10% grade at 50 mph. Besides, I have a zero-guilt reason now to finally put some good wheels on the bike. They have always been the weak link on my Roubaix.
    .