Note: This is part II of a 2 part series. Part I can be
found here.
The Cane Creek 110 IS41 stainless steel headset arrived last week, and I set about installing it, but it didn't fit, at least not until I got real creative, and reused the OEM crown race as a top bearing spacer. Before I forget, it looks like Universal refunded my return, so kudos for them.
 |
| Red and black and rock solid for 110 years. Note the very tiny gap between the headtube face and the bearing cap. The hint of blue between is the bearing cap's rubber seal, and seals the headset bearings from the weather. |
I hope Google finds this pair of posts noteworthy, and thousands of owners with AheadSet, or MindSet, or whatever headsets, can do this without the gut-wrenching fear of destroying their frames I endured.
My gut tells me it will be mostly professional mechanics that end up using these two posts, and that is why I took the trouble to take so many photos. Many of the details will not mean much unless you're neck deep in fear and uncertainty, and then they'll be priceless.
If your bike is a year old or more, and you have one of these non-standard headsets, I would strongly recommend you replace it with a standard Cane Creek, system (Cane Creek AKA Dia Comp, invented the Integrated System ~ 20 yrs ago).
You can go top of the line with the 110, like I did, and get a 110 yr guarantee, but the 40-series I started with is also perfectly acceptable, and may well last the life of the bike for those putting 2-3,000 miles per year on their bikes.
An important physical difference between the 40 and 110 bearings, is the entire depth of the 110 bearing is full diameter, whereas the 40 bearings are smaller in diameter after 3-4mms. The 110 bearings are therefore much less likely to ovalize in the headset.
The longer you wait, the greater the chance that parts and mechanics are going to be unavailable to fix your headset. (assuming you can't get a standard replacement headset to work, or you need some OEM part to make the new system work properly)
My go-to mechanic, Eddy at MadCat, a very wrench-centric shop, had only seen one other headset like mine, and that was on a mtb. Time will eventually paint you into a corner, and force you to abandon your frame. Don't let that happen.
------
As soon as I got the bike home from the shop, I cleaned the headtube thoroughly with 99% rubbing alcohol, and studied the old and new systems to make sure I understood how they worked, and fit together. I also inspected the 45 degree flanges milled into the aluminum., bonded sub-structures.
When I got the new CC 110 headset, it was immediately obvious that the crown race was not going to fit my carbon fork. I was pretty disgusted that the bottom of the steering tube, right above the crown-race bulged area, wasn't even fully epoxied. Some of the carbon weave was exposed. That's one of the most critical areas in the fork, so that's an inexcusable lapse in QA, and a serious safety issue. Nevertheless, I had to find a way to reduce the diameter from 30.10 to 30.00 mm.
I bought a set of assorted 3M Wet Or Dry sandpaper at the autoparts store, cut a 4x8" sheet of 320 grit into 8mm strips 8" long, wet them, and worked my way around the fork, turning it about 30 degrees on each turn, while sawing the sandpaper back and forth to engage 3 sides at once. I paid special attention to a very rough area that looked like it had been cut with a crown race tool meant for metal steering tubes. Another serious flaw in the OEM fork.
After 2-3 times around the steering tube base, stopping each time to slip the new CC crown race down to check the fit, I was getting pretty close. The crown race would rock back and forth over the high points, so I made marks on the steering tube with a grease pencil and focused on those. (99% alcohol removes the grease pencil markings)
I was able to get the crown race down to within ~ 3mm by pulling it down with my finger tips, and knew I was getting close. You need a very snug fit, but can't risk bending the race, as it is very thin on the CC system.
About that time I noticed the very bottom of the steering tube, where the base of the race would engage it, was a bit wider, and tapered slightly. Sandpaper just doesn't have enough structure to make a nice, clean 90 degree interface between the top of the fork and the bottom of the steering tube.
After some head-scratching, I decided to use a high quality, diamond impregnated finger-nail file, and carefully work my way around the base of the tube. That worked very nicely, and after a final light sanding, I did one last trial fit, and decided I was close enough that I could get the crown race to seat very snugly, and all the way down - although you never really know until you try it.
If you have an extra $13, I would suggest ordering an extra crown race with the headset. It's always a lifesaver to have an extra, and I wouldn't have wanted to have waited another week for parts.
As it was, even without grease, the crown race seated perfectly, and the "machining" of the steering tube with 320 grit wet or dry, left a very smooth finish. I never did use the 400, 600 or 800 grit included in the assorted package.
You never want to take too much off the steering tube, and have a loose fit. There's no good way to recover from that. You've just ruined the fork. In that situation you could try using some silicon caulk, but really, you've ruined the fork. With the crown race in place, I trial fit the bearing in the headtube, and checked the seal. PERFECTION!
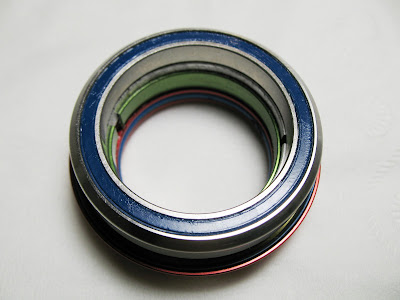
 |
| The bearing facing looks pretty rough, like a file was used on it, but it doesn't affect the function. I am going to send this pic to Cane Creek though and ask them if it's been used or this is factory spec. |
 |
| Topside assembly with OEM crown race retasked as a spacer |
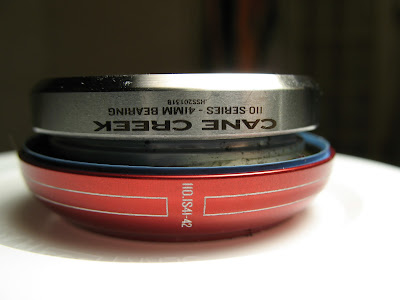 |
| Side view of topside assembly with the OEM crown race showing under the top bearing. Note that the 110 series bearings are the full diameter for their entire depth. The 40 series are not. |
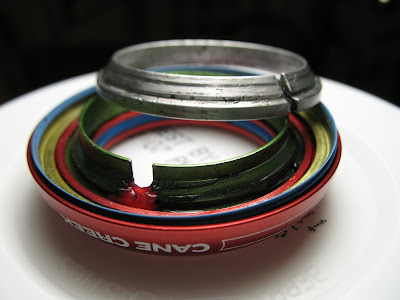 |
| 45 degree bevel on OEM crown race, and 30mm ID make it a perfect spacer, and saved me from having to reface 5-6mm off the top face. Smooth as glass when installed. |
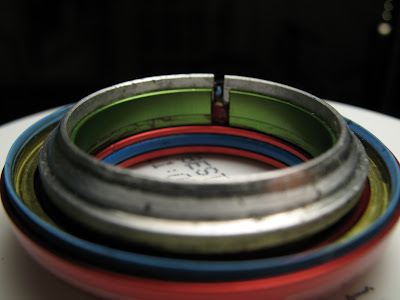 |
| When compressing, align the two splits |
 |
| Split realigned under compression when fully assembled by rotating the top cap 180 degrees |
Even while trial fitting the bottom bearing, it was clear the top bearing was going to seat far too low to keep the lip seal on the bearing top cap from betting smashed against the top face of the headtube - and by 5-6mm. My heart sank. Was this even going to work?
After greasing the top of the steering tube, I slid the top cover down, careful to not damage the internal O-ring seal, and confirmed my suspicion. (CC's O-ring seal is VERY tight. Grease and then wipe dry with alcohol before clamping the stem down)
One option was to have the top of the headtube refaced. I check, and the Part Tool facing tool was $450. It was 10:00 at night, and I really didn't want to drag the bike down to a shop and hope they knew what they were doing. I also had no good way to know now much I needed to machine the headtube down, and it should be fit to less than a half a millimeter, as the shims are 0.25mm each, and there is only room for 2-3 on top of the compression ring.
Frantic, I looked around for anything I had in my parts bin that might work, and then looked in the project tray I'd put the old headset parts in. The OEM split crown race looked promising. It SHOULD be the right dimensions, the right angles, and hopefully, enough material to take up the extra space. It worked!
As you can see in the pics, it's pretty beat up, and I have ordered an FSA Orbit replacement crown race, but flipping that crown race upside down and placing it over the compression ring works great. It might even add some strength to the headset in the process.
I initially aligned the split gaps on the compression ring and OEM race, so they would compress together, and not gouge each other, pushing their edges together when compressing. Once on the bike, I used my hand's thumbweb area to rotate the loosely compressed headset cover/bearing cap 180 degrees. When I pulled the headset apart after a short 20 mi ride, they were still on opposite sides, as you can see in the photo. This is probably the strongest, and best centered arrangement, so I recommend it.
I tightened the compression cap down hard to really compress the stack, making sure the crown race, bearings, compression ring, and OEM race were all fully seated. Having a bunch of extra spacers meant I could do a lot of the trial fitting without messing with the stem and bars. Nice tip. Unfortunately, the lip seal was too tight against the top headtube face, so I needed to figure out how to use the 0.25mm shims I'd bought.
Taking the whole assembly apart again, I "peeled" the compression ring out of it's captive groove, machined into the bearing cap assembly, added 2 stainless shims, and reinstalled the compression ring. Reassembled. Too much. I could see daylight between the face and the seal. Disassemble, remove compression ring, remove 1 shim, replace compression ring, reassemble. PERFECTION!
I used a small pair of side-cutters/wire dykes to remove the compression ring, grasping the edge of the split, but did leave a small engraving on it, so a high quality pliers would have been better. A nose pliers will not work. Too flexible and not enough leverage. I didn't make a video of that, but maybe I'll remember when the new FSA Orbit crown race arrives and I have to pull the whole top end apart again.
 |
| Zero stack height, InterLok to flat surface, brass ring adapter. It allows Cane Ceek 110 series headsets to interface directly with the bottom of any standard stem. My personal RX would be to buy some insurance and top that off with a 0.25mm or 0.50 stainless steel shim/spacer. These shims are meant to be used inside the bearing cap to raise it enough that the rubber lip seal just touches the headtube face - without any daylight showing between them. |
 |
| CC brass interface spacer in place in an InterLok nylon spacer |
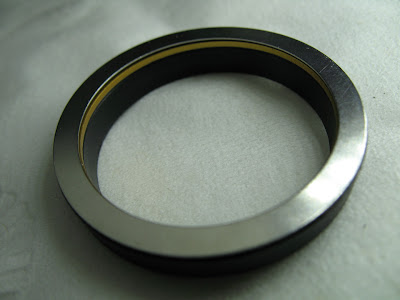 |
| This simulates the top of the bearing cap on a 110 system, brass ring and stainless shim in place, ready to interface with bottom of handlebar stem. An intriguing idea is to use this setup, but replace the brass ring with an O-ring to get a primary weather seal right at the bottom of the stem's cut, which will leak water like a sieve in the rain. |
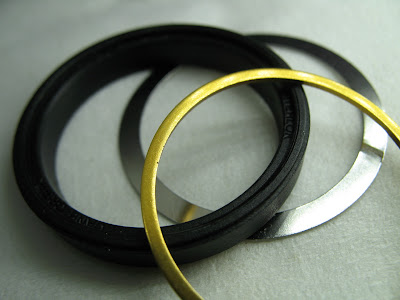 |
| Nylon spacer, stainless steel shim, and brass interface ring. |
-------
Having been through all of this, I have to say, while integrated headsets are a clean solution, Chris King has made some very good points as to the folly that motivated this design. External bearing cups are just better. Period. They ensure that whatever happens to a headset, the frame is never in jeopardy.
Of all the integrated designs, I think the
ZeroSet is the best, as the top of the bearing cap also comprises the sealing surface on top of the headtube. It means you won't need to reface your headtube to get a perfectly smooth and flat sealing surface. My frame, unfortunately, needs some smoothing out, as I'm sure, most IS style frames do over time.
 |
| Cane Creek ZeroStack - AKA ZeroSet. The press-in steel insert extends over the top of the headtube's face, adding strength and a perfect lip-seal mating surface |
I'm also going to write
Ceradyne ceramics, and suggest they manufacture the inserts that receive the sealed bearings, which are bonded to the carbon headtube, out of ceramic. They make almost all of the body armor used by the DOD, all of the helicopter, and most of the vehicle armor as well.
Chris King's very real concern, is the back and forth rocking of a headset can ovalize these inserts, commonly made of aluminum, until the sealed bearings start to rock back and forth in the frame - rendering it useless.
Titanium diboride ceramic is about the same weight as aluminum, but is tougher than tungsten, and about any other substance on Earth. It might cost a frame maker $50-$100, but would make integrated headsets light, and bombproof.
My OEM press-in bearings used a deep penetrating insert, which fit into, and past, the 45 degree bearing support flange to prevent ovalizing of the aluminum bonded sub-structures. That was a good decision. Having no effective seals, unforgivable. I never rode in the rain because I knew the headset wasn't sealed, and look how utterly destroyed the headset was anyway.
I'm a lot less impressed with Specialized as a brand, because they are doing far too many things, in headsets, and bottom brackets, that make their bikes hard to service - IE: disposable. It's also worth pointing out that upright "comfort bikes", with long steering tubes, and lots of spacers, place a lot of extra strain on the headtube, and headset bearings.
Asked for a RX for a new $2,500 bike last week, I recommended a Motobecane mail order special. Until you get above $4k, I just don't think the name brands are buying you much, and the prices are almost double. A name brand should buy you dependable, reliable QA, and so far, I haven't seen that.
.


