Tuesday, December 27, 2011

Techie Tuesday: PI Barrier Balaclava

.
I  normally save Techie Tuesdays for wrenching stuff, but given the amount of heat that can be lost through the head, the one extremity your body can't cut off blood flow to (although I've heard people say things at times that makes me wonder if they were the exception), a review of a balaclava seems worthy of an exception. 

Sunset on the ARPT near Hagen Park, Christmas Day, 2011
Fish Hatchery outlet at Hazel Ave Bridge, just below Nimbus Dam, looking downstream
I've done 3 rides for about 100 miles now using this balaclava, and think I made a good choice. Until the sun goes down, this, in conjunction with my PI headband, works great, and I thought this combo was bombproof, but that was until the sun went down.
 

Once the sun starts to set, temperatures drop like a stone, and the coldest air settles down in draws along the river within minutes. It's hard to believe how cold the air can get in spots, until you encounter it. I am just a tiny bit disappointed to have to report that the back of my head and neck were getting a little cold in what was probably 35-38 degree weather.

Nimbus Dam on the ARPT near Hazel Ave. This dam forms Lake Natomas and is well served by the Aquatic Center in the background to the right. If you're a competitive rower, you know this lake and facility well.
If it would fit under the very snug balaclava, the PI Barrier Skull Cap would offer the extra protection I'd need, but since there are no sizing options on either of these, it's a hard sell.

Although I generally hand wash my riding clothes, the amount of laundry on my last ride just became overwhelming, so I machine washed all of it. The dryer shrunk this substantially,perhaps 3/4" - in height, but AFAICT, not in diameter.

As it comes out of the package, the amount of material in front is very generous, and that in back about right, but once shrunk, the back is too short. It will cover when you can get out of the cold and rearrange all of your layering pieces for best fit, but after riding for an hour, and turning your head from side to side, it tends to leave a gap in the back.

The very generous length in front is greatly appreciated when the weather is warmer, or you're climbing, and need all of your layers wide open. This allows plenty of cold, dry air into your chest, and through your layers, to dry them and cool, while still protecting your neck.

I agree that the fit is tight, and I have a small head, but it does tend to loosen up a bit after wearing and laundering it a few times. They probably need 3 sizes though, as I got a compression headache wearing it around the house for an hour when I first got it in the mail.

I also noticed that once heat dried, the barrier fabric on the forehead is totally, and completely windproof. I held it over my mouth and cannot blow air through the fabric at all. I mean, it's like Saran wrap, and that's great. Well done PI!

It's not that thick, so it might not be the warmest insulator, but for the forehead I have the headband too, as it has holes for my clear riding glasses - something this balaclava should have too, as the stems on glasses create little air scoops where they go under headgear, which freezes your temples unless you have stem holes.

The new Barrier Headband doesn't seem to have stem holes, but is likely your best bet for holding your glasses in place anyway. Get the Barrier not the Transfer headband. You want the outermost layer to be windproof, or it's just a waste of cloth. Pull it down in back until your helmet band is resting on top of it. That seems to seal the wind out better.

One of the issues with each layer having a fleece collar, is they wad up behind your neck, and make it nearly impossible to hold your head up when riding. This causes painful neck strain, and headaches.

Since the balaclava typically goes under your base layer behind your neck, why not use the barrier windproof fabric, which is also thinner, to insure a deep, last ditch zone of wind protection running from your head, down your neck and well down your back? Less neck strain and the security of knowing bare skin isn't going to be exposed on the back of the neck.  Make it slightly longer than the front, with the shoulders cut away. This would protect your neck no matter how much opening and closing of front zippers.

I expected, being a garment for very active users, that the mouth area would have to breathe well, unlike those neoprene ski mask things. PI has done a great job in making the fabric covering the mouth breathe well. In very cold weather, the moisture in your breath will freeze in the fabric, and form an ice dam. When inhaling, this wet, 32 degree surface warms and moistens your breath before you inhale. It will keep your lungs from getting burned in very cold, dry conditions.

Also, as expected, the mouthpiece pulls down under the chin easily, and stays put well without pulling the forehead down - even when using a PI headband. If they made this in sizes I'd get the middle size and buy their barrier cap to use when riding after sunset.

For better visibility on those night rides, a reflective stripe in the middle of the barrier fabric that protects the cheekbones and forehead really is needed. Everything else is going to be covered by your helmet, but that area is well exposed.

With cheap, powerful lights, like the MagicShine lights, my clubs are doing a lot of night rides, and I also routinely ride solo, finishing the last half of the ride after dark, where temps often drop 10-15 degrees in half an hour or so, especially along the river where cold, heavy, air settles in draws. 50 degrees turns into 35 in less than 10 miles.

It's essential to get your clothing right, and have a good warmth reserve in case you crash, and EMS is an hour or more away. A convertible vest with zip on sleeves and SpaceBlanket foil blanket are as important as your cell phone when riding alone. Shivering with cracked or broken ribs is excruciating.

Keep working your clothing problem until you have enough tools to go properly dressed in all conditions. It's NOT necessary to endure discomfort when riding in the cold. Keep at it until you aren't.

Monday, December 12, 2011

Joy to the Whirlled

Coming back from Folsom and extending down to William Pond Park, I was struck by how much easier it seemed last night. The same 32 miles and 2,050 feet, but not distracted by a million nagging thoughts. It's that time of year. Easy to be distracted and stressed out. What a difference a little Zen makes.

Cold tonight, and it was almost dark by the time I made it up to Folsom, but the paint of the setting sun on the river was breathtaking. Wish I'd had the camera along. I added another, slightly oversize vest tonight. This one has a mesh back above the kidneys, so the smaller PI vest under it doesn't vent in the same place. This makes the inner vest something of a diffuser when left zipped down 4-5 inches. I adjust the outer vest for temp and effort. A nice trick.

Good news. I'm almost certain the creaking isn't in the headset. I have tic in the front wheel, and, maybe a creak in the BB, but can't make the headset creak at home, no matter how hard I torque it, and I torqued it a LOT. The wheel tic is probably sand inside the rim, but I'm going to repack the front hub as well, because I bought new balls to do that and have been looking for an excuse to do so.

I am starting to think I wasted my money going with Cane Creek when it looks like I could have gotten the same thing directly from Taiwan from the people who probably are making Cane Creek's stuff - Token. See for yourself.
Is Cane Creek just another marketing department farming out production to Taiwan? If so I'd rather just buy direct for 30% of the CC price. If Boeing can fab in the Carolinas, why can't CC?.
Saw a 250 lb buck who looked at me with total disregard as I closed in with my lights on. Rabbits running in front of me the whole 7 miles downstream from Sunrise to WPB. Some Wiley Coyote is going to make a meal of them if they keep doing that.

I've seen that happen on group rides, though sometimes the rabbit makes it across the trail before we get there and the coyote doesn't, and the rabbit is long gone by the time 4-5 of us pass. One of the beauties of the ARPT. I also like that it never stops changing with the seasons.

There is still lots of green grass growing under the dead brush, and the deer and white flies know exactly where the warm air is, and where the cold air settles. BTW, if camping, just on the high water side of a dam is a nice warm place to camp, because the cold air goes over the dam and settles down in the river bottom. 20 ft uphill, against a sun-baked south rock face, with some tree coverage is even better.

I had a little company last night for a few miles, which is really rare this time of year. His gloves were about to fall out of his jersey, so I hammered and and bridged up so I could give him an FYI. His toes were freezing, so I told him about the SpaceBlanket fix - which I used to keep my neck warm tonight, and it worked wonders.

I'm spending lots of time in the drops, and really like the new bars now that I've got the bottoms of the drops pushed forward so much. Makes the brake blocks a much more comfortable perch too. With all my clothing wadded up in the back of my neck, riding in aerobars causes a lot of neck strain.

All in all, this ride seemed a lot easier tonight, and no hesitation at Sunrise in extending the ride. The new lens is working great. It keeps growing on me. The best $5 I ever spent.

Tuesday, December 6, 2011

Techie Tuesday: Pt II - Headset R&R on Specialized '06 Roubaix Elite

Note: This is part II of a 2 part series. Part I can be found here.

The Cane Creek 110 IS41 stainless steel headset arrived last week, and I set about installing it, but it didn't fit, at least not until I got real creative, and reused the OEM crown race as a top bearing spacer. Before I forget, it looks like Universal refunded my return, so kudos for them.

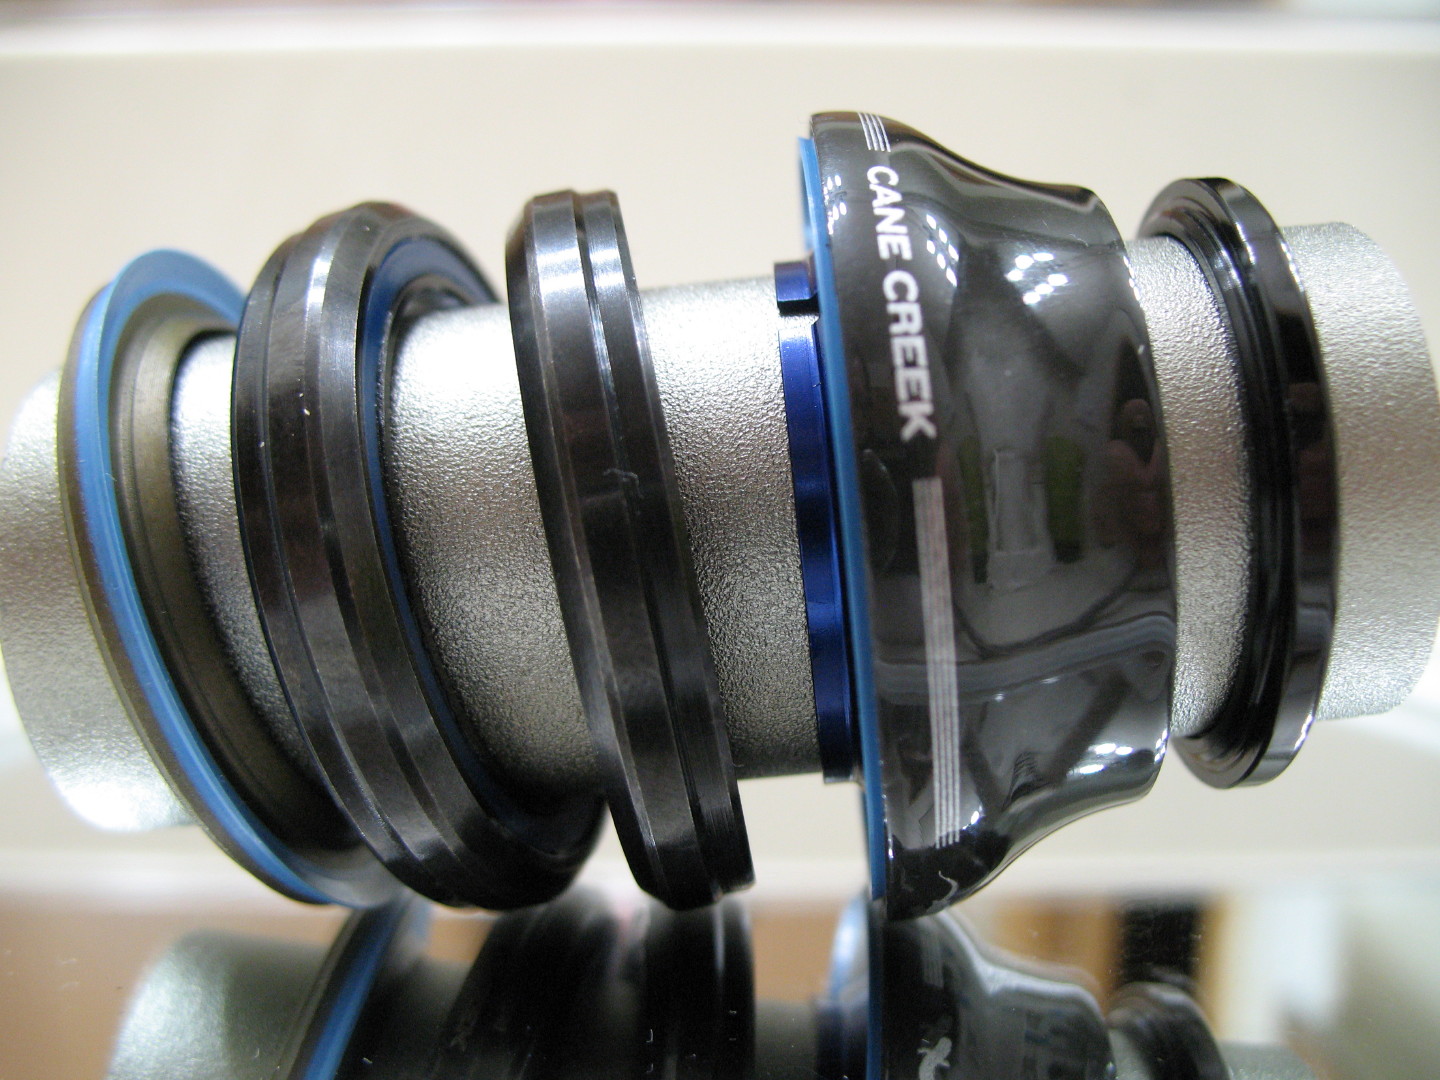
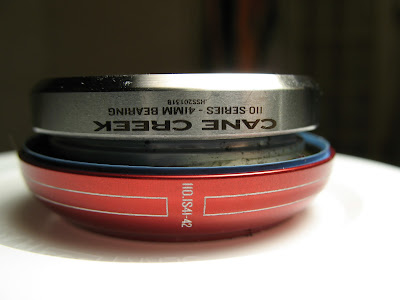
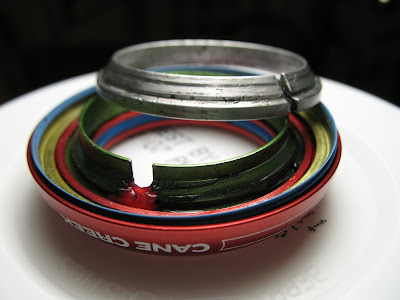
Red and black and rock solid for 110 years. Note the very tiny gap between the headtube face and the bearing cap. The hint of blue between is the bearing cap's rubber seal, and seals the headset bearings from the weather.
I hope Google finds this pair of posts noteworthy, and thousands of owners with AheadSet, or MindSet, or whatever headsets, can do this without the gut-wrenching fear of destroying their frames I endured.

My gut tells me it will be mostly professional mechanics that end up using these two posts, and that is why I took the trouble to take so many photos. Many of the details will not mean much unless you're neck deep in fear and uncertainty, and then they'll be priceless.

If your bike is a year old or more, and you have one of these non-standard headsets, I would strongly recommend you replace it with a standard Cane Creek, system (Cane Creek AKA Dia Comp, invented the Integrated System ~ 20 yrs ago).

You can go top of the line with the 110, like I did, and get a 110 yr guarantee, but the 40-series I started with is also perfectly acceptable, and may well last the life of the bike for those putting 2-3,000 miles per year on their bikes.

An important physical difference between the 40 and 110 bearings, is the entire depth of the 110 bearing is full diameter, whereas the 40 bearings are smaller in diameter after 3-4mms. The 110 bearings are therefore much less likely to ovalize in the headset.

The longer you wait, the greater the chance that parts and mechanics are going to be unavailable to fix your headset. (assuming you can't get a standard replacement headset to work, or you need some OEM part to make the new system work properly)

My go-to mechanic, Eddy at MadCat, a very wrench-centric shop, had only seen one other headset like mine, and that was on a mtb. Time will eventually paint you into a corner, and force you to abandon your frame. Don't let that happen.

------

As soon as I got the bike home from the shop, I cleaned the headtube thoroughly with 99% rubbing alcohol, and studied the old and new systems to make sure I understood how they worked, and fit together. I also inspected the 45 degree flanges milled into the aluminum., bonded sub-structures.

When I got the new CC 110 headset, it was immediately obvious that the crown race was not going to fit my carbon fork. I was pretty disgusted that the bottom of the steering tube, right above the crown-race bulged area, wasn't even fully epoxied. Some of the carbon weave was exposed. That's one of the most critical areas in the fork, so that's an inexcusable lapse in QA, and a serious safety issue. Nevertheless, I had to find a way to reduce the diameter from 30.10 to 30.00 mm.

I bought a set of assorted 3M Wet Or Dry sandpaper at the autoparts store, cut a 4x8" sheet of 320 grit into 8mm strips 8" long, wet them, and worked my way around the fork, turning it about 30 degrees on each turn, while sawing the sandpaper back and forth to engage 3 sides at once. I paid special attention to a very rough area that looked like it had been cut with a crown race tool meant for metal steering tubes. Another serious flaw in the OEM fork.

After 2-3 times around the steering tube base, stopping each time to slip the new CC crown race down to check the fit, I was getting pretty close. The crown race would rock back and forth over the high points, so I made marks on the steering tube with a grease pencil and focused on those. (99% alcohol removes the grease pencil markings)

I was able to get the crown race down to within ~ 3mm by pulling it down with my finger tips, and knew I was getting close. You need a very snug fit, but can't risk bending the race, as it is very thin on the CC system.

About that time I noticed the very bottom of the steering tube, where the base of the race would engage it, was a bit wider, and tapered slightly. Sandpaper just doesn't have enough structure to make a nice, clean 90 degree interface between the top of the fork and the bottom of the steering tube.

After some head-scratching, I decided to use a high quality, diamond impregnated finger-nail file, and carefully work my way around the base of the tube. That worked very nicely, and after a final light sanding, I did one last trial fit, and decided I was close enough that I could get the crown race to seat very snugly, and all the way down - although you never really know until you try it.

If you have an extra $13, I would suggest ordering an extra crown race with the headset. It's always a lifesaver to have an extra, and I wouldn't have wanted to have waited another week for parts.

As it was, even without grease, the crown race seated perfectly, and the "machining" of the steering tube with 320 grit wet or dry, left a very smooth finish. I never did use the 400, 600 or 800 grit included in the assorted package.

You never want to take too much off the steering tube, and have a loose fit. There's no good way to recover from that. You've just ruined the fork. In that situation you could try using some silicon caulk, but really, you've ruined the fork. With the crown race in place, I trial fit the bearing in the headtube, and checked the seal. PERFECTION!

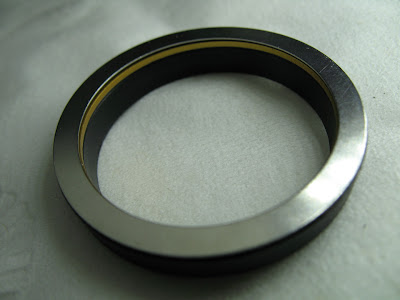
The bearing facing looks pretty rough, like a file was used on it, but it doesn't affect the function. I am going to send this pic to Cane Creek though and ask them if it's been used or this is factory spec.
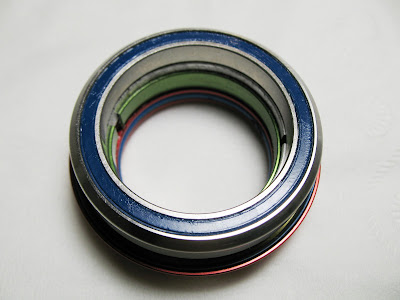
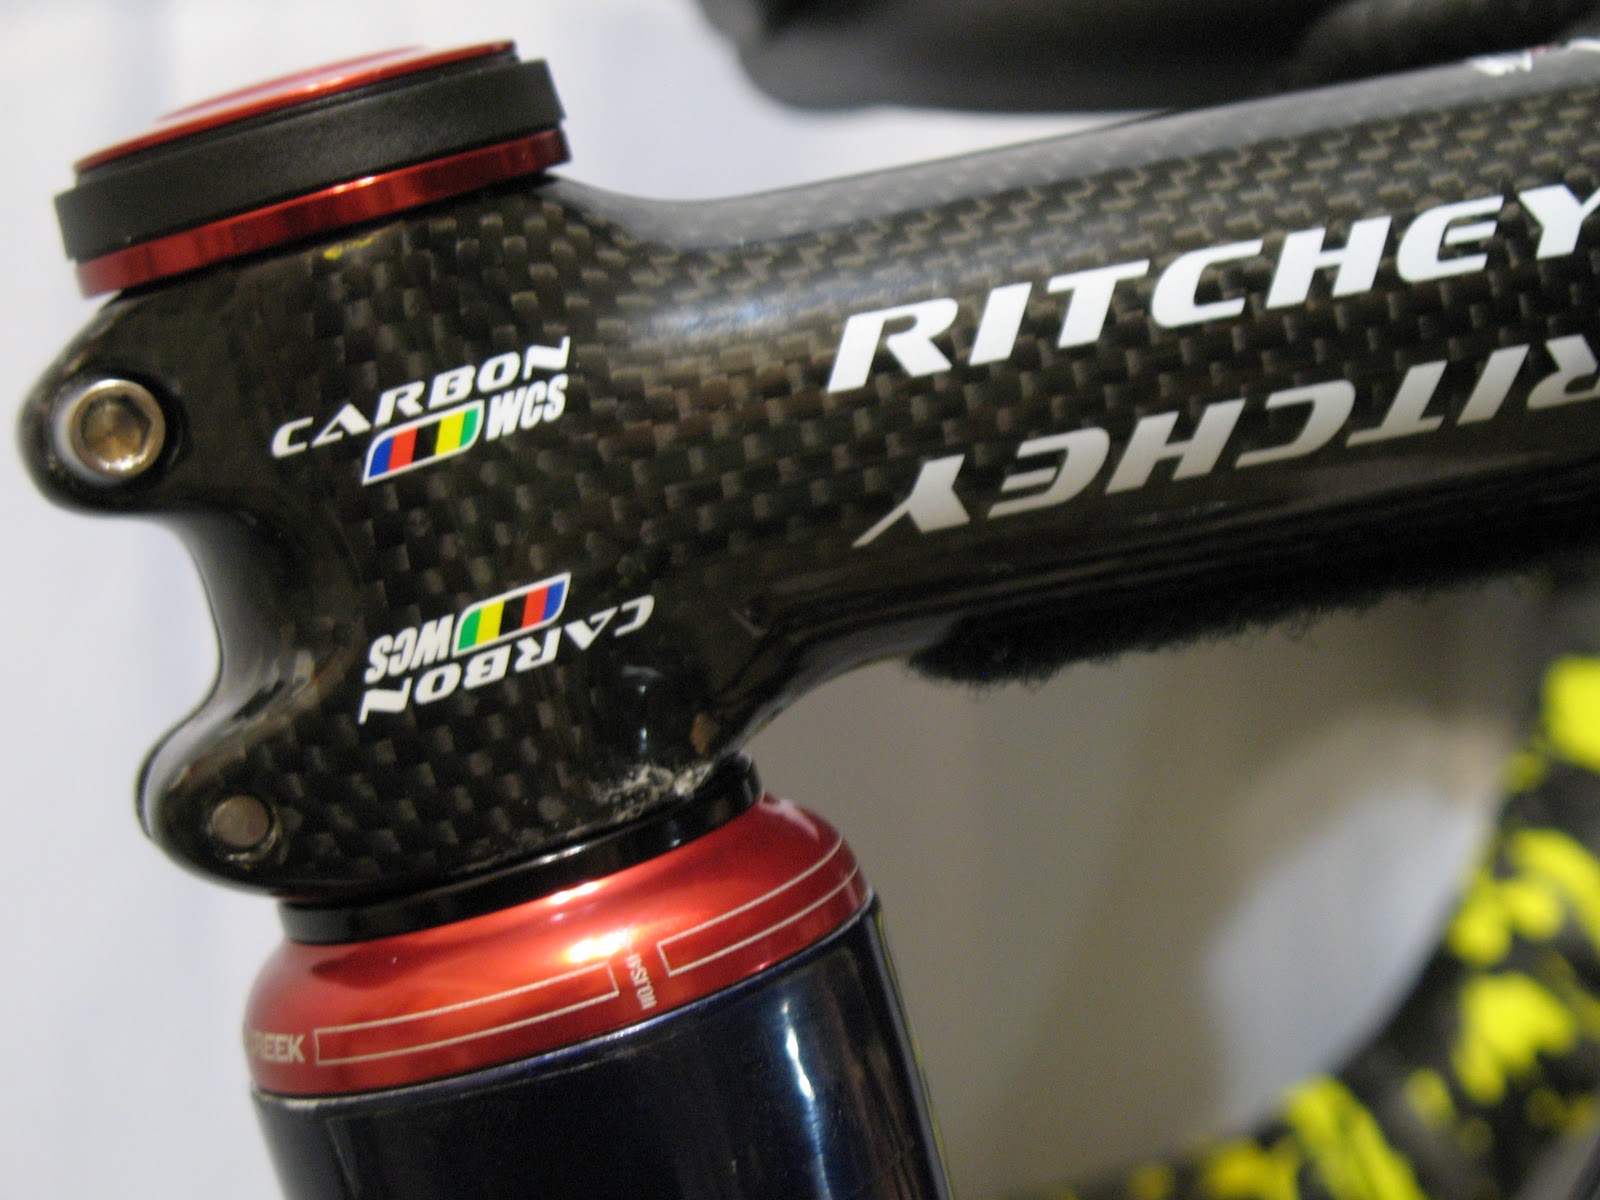
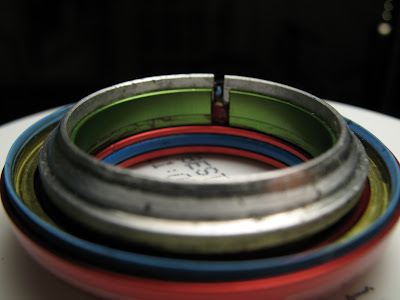
Topside assembly with OEM crown race retasked as a spacer

Side view of topside assembly with the OEM crown race showing under the top bearing. Note that the 110 series bearings are the full diameter for their entire depth. The 40 series are not.
45 degree bevel on OEM crown race, and 30mm ID make it a perfect spacer, and saved me from having to reface 5-6mm off the top face. Smooth as glass when installed.
When compressing, align the two splits
Split realigned under compression when fully assembled by rotating the top cap 180 degrees
Even while trial fitting the bottom bearing, it was clear the top bearing was going to seat far too low to keep the lip seal on the bearing top cap from betting smashed against the top face of the headtube - and by 5-6mm. My heart sank. Was this even going to work?

After greasing the top of the steering tube, I slid the top cover down, careful to not damage the internal O-ring seal, and confirmed my suspicion. (CC's  O-ring seal is VERY tight. Grease and then wipe dry with alcohol before clamping the stem down)

One option was to have the top of the headtube refaced. I check, and the Part Tool facing tool was $450. It was 10:00 at night, and I really didn't want to drag the bike down to a shop and hope they knew what they were doing. I also had no good way to know now much I needed to machine the headtube down, and it should be fit to less than a half a millimeter, as the shims are 0.25mm each, and there is only room for 2-3 on top of the compression ring.

Frantic, I looked around for anything I had in my parts bin that might work, and then looked in the project tray I'd put the old headset parts in. The OEM split crown race looked promising. It SHOULD be the right dimensions, the right angles, and hopefully, enough material to take up the extra space. It worked!

As you can see in the pics, it's pretty beat up, and I have ordered an FSA Orbit replacement crown race, but flipping that crown race upside down and placing it over the compression ring works great. It might even add some strength to the headset in the process.

I initially aligned the split gaps on the compression ring and OEM race, so they would compress together, and not gouge each other, pushing their edges together when compressing. Once on the bike, I used my hand's thumbweb area to rotate the loosely compressed headset cover/bearing cap 180 degrees. When I pulled the headset apart after a short 20 mi ride, they were still on opposite sides, as you can see in the photo. This is probably the strongest, and best centered arrangement, so I recommend it.

I tightened the compression cap down hard to really compress the stack, making sure the crown race, bearings, compression ring, and OEM race were all fully seated. Having a bunch of extra spacers meant I could do a lot of the trial fitting without messing with the stem and bars. Nice tip. Unfortunately, the lip seal was too tight against the top headtube face, so I needed to figure out how to use the 0.25mm shims I'd bought.

Taking the whole assembly apart again, I "peeled" the compression ring out of it's captive groove, machined into the bearing cap assembly, added 2 stainless shims, and reinstalled the compression ring. Reassembled. Too much. I could see daylight between the face and the seal. Disassemble, remove compression ring, remove 1 shim, replace compression ring, reassemble. PERFECTION!

I used a small pair of side-cutters/wire dykes to remove the compression ring, grasping the edge of the split, but did leave a small engraving on it, so a high quality pliers would have been better. A nose pliers will not work. Too flexible and not enough leverage. I didn't make a video of that, but maybe I'll remember when the new FSA Orbit crown race arrives and I have to pull the whole top end apart again.
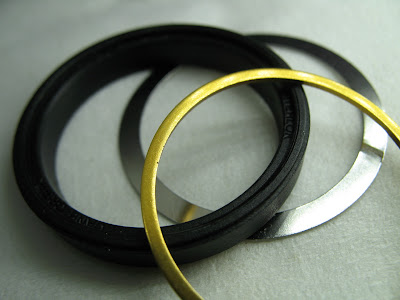
Zero stack height, InterLok to flat surface, brass ring adapter. It allows Cane Ceek 110 series headsets to interface directly with the bottom of any standard stem. My personal RX would be to buy some insurance and top that off with a 0.25mm or 0.50 stainless steel shim/spacer. These shims are meant to be used inside the bearing cap to raise it enough that the rubber lip seal just touches the headtube face - without any daylight showing between them.

CC brass interface spacer in place in an InterLok nylon spacer

This simulates the top of the bearing cap on a 110 system, brass ring and stainless shim in place, ready to interface with bottom of handlebar stem. An intriguing idea is to use this setup, but replace the brass ring with an O-ring to get a primary weather seal right at the bottom of the stem's cut, which will leak water like a sieve in the rain.

Nylon spacer, stainless steel shim, and brass interface ring.


-------


Having been through all of this, I have to say, while integrated headsets are a clean solution, Chris King has made some very good points as to the folly that motivated this design. External bearing cups are just better. Period. They ensure that whatever happens to a headset, the frame is never in jeopardy.

Of all the integrated designs, I think the ZeroSet is the best, as the top of the bearing cap also comprises the sealing surface on top of the headtube. It means you won't need to reface your headtube to get a perfectly smooth and flat sealing surface. My frame, unfortunately, needs some smoothing out, as I'm sure, most IS style frames do over time.
Cane Creek ZeroStack -  AKA ZeroSet. The press-in steel insert extends over the top of the headtube's face, adding strength and a perfect lip-seal mating surface
I'm also going to write Ceradyne ceramics, and suggest they manufacture the inserts that receive the sealed bearings, which are bonded to the carbon headtube, out of ceramic. They make almost all of the body armor used by the DOD, all of the helicopter, and most of the vehicle armor as well.

Chris King's very real concern, is the back and forth rocking of a headset can ovalize these inserts, commonly made of aluminum, until the sealed bearings start to rock back and forth in the frame - rendering it useless.

Titanium diboride ceramic is about the same weight as aluminum, but is tougher than tungsten, and about any other substance on Earth. It might cost a frame maker $50-$100, but would make integrated headsets light, and bombproof.

My OEM press-in bearings used a deep penetrating insert, which fit into, and past, the 45 degree bearing support flange to prevent ovalizing of the aluminum bonded sub-structures. That was a good decision. Having no effective seals, unforgivable. I never rode in the rain because I knew the headset wasn't sealed, and look how utterly destroyed the headset was anyway.

I'm a lot less impressed with Specialized as a brand, because they are doing far too many things, in headsets, and bottom brackets, that make their bikes hard to service - IE: disposable. It's also worth pointing out that upright "comfort bikes", with long steering tubes, and lots of spacers, place a lot of extra strain on the headtube, and headset bearings.

Asked for a RX for a new $2,500 bike last week, I recommended a Motobecane mail order special. Until you get above $4k, I just don't think the name brands are buying you much, and the prices are almost double. A name brand should buy you dependable, reliable QA, and so far, I haven't seen that.
.

Wednesday, November 30, 2011

Deadlines and Commitments

As is usual this time of year, parcel deliveries slow to a crawl. No headset or BB replacement parts yet, but the new front derailleur is here and ready to go, Universal Bikes issued the return authorization, and I have shipped the part back for a refund.

By the time I pull the crank to replace the BB, with the fork, headset, brakes and chain off, there's not going to be much left of my bike but parts. I was cleaning the brakes with hot water and Simple Green, and noticed the back SRAM Force brake has a clear coating on it - which has almost completely come off on mine. More troublesome, the center of the brake is obviously pitted, and right in the area of maximum stress.

Pitting in the center of the brake bridge
Clear, plastic coating protecting the aluminum structure is long gone.

I assume this is from sand and sweat? At any rate, the brake is now on it's way to failure. Metal cracks always start in pits, and propagate from pit to pit to complete failure. Aluminum is pretty susceptible to chemical erosion, but still,  I must have some pretty harsh sweat! It may not fail for years, or it may fail the next time I grab the brake hard, or it may fail tomorrow.


The clear plastic coating also incorporates the brake's Force logo
These SRAM Force brakes are wonderful, and have performed flawlessly, but come spring, I will be looking for a sale, and will replace them, or at least, the rear brake. The front brake is in perfect condition. I'm really kind of shocked I'm having a problem after less than 4 years. The brakes were the very first thing I upgraded on the bike, but still, shocking.

MagicShine MJ-808E  over MJ-808. I prefer the SSC P7 emitter's bluer 900 lumen light on the bottom to the yellowish hue of the 1000 lumen, CREE XM-L emitter. I think the CREE holds a narrower beam though, and may penetrate fog better, so am going to leave it up on the helmet for now.

I was tempted to do my video for what will now be an upcoming Techie Tuesday piece on optimal lighting, but since I haven't even done one ride with the dual MagicShine lights, it would have been premature. I bought both of these lights from GeoMan. The batteries are state-of-the-art, made in Germany, or now, the US.

The 6,000mAh battery packs I ordered are made from Panasonic's very best 3100mAh LION cells. If you can even find them on the web, they're around $25. That makes GeoMan's $85 price a real bargain. I want the best possible power-to-weight ratio, and these deliver in spades.

I'm also impressed that GeoMan only rates these packs at 6000, even though they are clearly 6200. Here's  a real American entrepreneur who sucked it up and scrambled for a top-notch battery pack builder when MagicShine's standard packs were catching fire.

You can buy MagicShine from Amazon now, but they're still selling the pyrotechnic battery packs, and have added nothing. GeoMan spent 2 yrs listening to his customers and scrambling to get things right. That's worth supporting. GeoMan is offering a 20% discount until December 5th, so an easy decision at the moment.

I got a cool $5 lens that does, indeed, spread the beam out horizontally, but haven't had it out on the trail, so will need to gain some experience with it too before commenting. The same lens technology would make a perfect side lens for a 270% rear lighting system up on the helmet.

Lots of good ideas, so why can't someone put them all together? Anyone know a company that can make a taillight to my specifications and mass produce it?

Sunday, November 27, 2011

Winter Wrenching Daze

These cold, gray, overcast skies are the perfect time to lose motivation to ride, but doing my annual maintenance on the bike always motivates me. I also like riding in the cold once I get out there and get warmed up, so all I really need is a reason to get out there.

With the cold night riding I've been doing, especially with SBH, I broke down and bought some "cheap" PI, Barrier Lite shoe covers to wear over my SpaceBlanket foot warmers. They look great, but the SpaceBlanket is doing all the work.
Very shiny, but with the bold, and hi-viz graphics, you don't have to guess about which is R and which L. Touted as being water repellant, rain shy, or perhaps, just scream in muted tones when attacked by raindrops.

The new 6703 front derailleur I ordered at Performance Bike Shop on the 8th, finally arrived yesterday, so I drove over and picked it up. Not sure if I save much on shipping, as gas is pretty expensive too, so may be doing most of my shopping on Amazon.com in the future.

They are building new warehouses like mad, and happy to say, many things that were sourced from 3rd parties, are now shipping from Amazon proper - which still has better quality, return, and shipping policies than most 3rd parties.

As for PBS, 20 days to ship a derailleur? Are you kidding me? Also sick of "sales" where the prices are all jacked up at 11:45 the night before. A sleazy way to do biz, and the prices never quite return to prior levels after the sale.

I'm spoiled by my SRAM chains having quick links, so I was a little miffed I had to get my chain tool out to break the DuraAce chain in order to get the old derailleur off last night (and now can't find the special case-hardened pins back, arrgghh).

I took the opportunity to clean the chain in a half dozen rounds of Simple Green and hot water in a heavy glass jar, very well shaken. I broke the first jar, probably because I didn't have distilled water to work with, and the hot water was a little too hot, but, in the end, I was able to clean it pretty thoroughly.


DuraAce chain. Extensive machining, but crap metalurgy
While the shifting performance of the DuraAce chain is excellent, all of the machining on it makes it  hard to clean, but more disturbing, was the corrosion on the chain. It looks like the zink-alloy plating is thin, and is peeling off. Because the Shimano drive train shifts so well, this chain hasn't spent any time "trawling" or grinding, so the level of wear is hard to understand.

The chain uses hollow pins, which I like, as they hold a small oil reserve, which keeps the chain from squeaking for much longer. Ditto for the SRAM hollow pin chains. I'm going to take a fresh look at the SRAM chain, and will probably go with that next time. It's more expensive, but I hope it will wear better, and since worn chains prematurely wear cassettes and chainrings, it's important to run the best possible chain.

I also noticed that the DuraAce chain has 4, count them, 4 different varieties of links, and I was only looking at the outside of the female plates (DuraAce chain has an inside surface and an outside surface for better shifting, in addition to the inside and outside, or male and female links all chains have).

Maybe after the earthquake Shimano is, or was, scraping the bottom of the barrel to find links, but this is not a great confidence builder. I'm also going to take another look at the Wipperman stainless chain. Stainless 300 should be 2-3X harder than 4130 CroMo, which I assume is what Shimano is using. BTW, I went with DuraAce instead of Ultegra because I heard nothing but bad about Ultegra durability.

Some American company should OWN the chain biz. We have the raw materials, technology, market size, and distribution system to beat any and all competitors. Hard to understand why the industry is so dominated by foreign parts. At least Wheelsmith is still making spokes here. Now if they would just make the butts taper instead of ramp. Eddy won't even use the WS 14/17 spokes on 3-cross spoking. Too many failures on the hub side where the spokes have to bend around each other sharply.

I will also be replacing my FSA Gossamer bottom bracket as soon as it, and the tool to install it, arrive in the mail. With the drive train so pulled apart I'm going to start with it completely clean, so will be pulling the cassette apart and cleaning that too. I'll either just use a clean rag or Simple Green and an electric brush. I'd normally replace the balls and repack the bearings on the wheels too, but I just did that two months ago, so will wait til spring for that, although my mtb hubs could benefit from new G10 balls.

In the meantime, I have been setting up my SS conversion to ride at night, which means putting together another saddle bag, adding lights, a Garmin mount, and finding a strap-on water bottle cage. A key element for a seat bag is a good alloy shank bit driver, and some high quality hex bits in 2.5,4,5,6, Phillips #1, and flat #4. The bits go in the hollowed out handle. I add a 1/4" ratcheting open-end wrench for torquing on things like chainring bolts, and have a complete toolkit that is lighter and much more flexible than those grotesque multi-tools.
Made in tool heaven. AKA Germany
 A key part of this one was the Wiha bits I bought. Made in Germany, and the official tools of BMW and Mercedes shop mechanics, the quality is phenomenal. They come in a nice plastic case, which is why I bought a 2nd set for wrenching at home. If I'm going to hump this stuff over 4,000 miles and 250,000ft every year, I want it to be absolutely reliable.

I've also been looking for a high quality 1/4" ratchet, and found Grainger is selling Proto tools, now owned by the Stanley cheap Chinese crap tool importers. The Proto ratchet is about $45, made in America, and will outlast me.
Proto J4749XL - 1/4" Drive Standard Length Full-Polish Ratchet
Why spend this kind of money on tools? Because life is too short to work with crap tools. They slow you down, waste your time, are frustrating to use, and when tools fail you, it's always at the worst possible moment, and often there are no good alternatives.

My father had about $65,000 in tools at one time, and started buying Snap-On, MAC, and Proto when his impact wrenches started shattering Sears Craftsman sockets left and right. Although guaranteed, he got tired of spending an hour a day driving to Sears and back to replace tools. Even though his tools were over 30 yrs old, they still brought about 60% of their replacement cost at auction. If you have kids, good tools make a wonderful, enduring legacy you can pass on. Besides, guys don't do jewelry, they do tools.

Also worth mentioning, my 2nd MagicShine showed up, and I put it up on my helmet the same day. I also found a nice lens that is supposed to spread the beam on the handlebar light out horizontally, but not waste light shining up into space. It was a $5 purchase, so we'll see how that goes, but I expect to have animals coming back out of hibernation riding with 2,000 lumens and 3 taillights. Now if it would just warm up a bit....

.

Wednesday, November 23, 2011

Techie Tuesday: Pt I - Headset R&R on Specialized '06 Roubaix Elite

This is part 1 of a 2-part series. Part II can be found here

I knew I was a little over-due pulling the fork off and inspecting, and maybe packing the headset, but WOW, I never expected to find it packed with mud and growing mold. It's probably been 3 yrs since I pulled the fork, but I do look at the headset every time I have the spacer stack off, or mount new bars.

The headset came out in pieces, although the stock FSA headset is a total POS, there are no replaceable parts, and repacking didn't seem to help at all, so if you have an early Roubaix, or some of the mid-2000 Specialized MTBs, just expect this is what you'll find, and have the parts there to do the R-n-R.

I was lucky, AFAICT, there is no permanent damage, but there might have been. The upper bearing cap seal on the FSA was just shot. Leaking like a sieve, and I never ride in rain intentionally.

Surprisingly, there weren't any good pics of the Cane Creek bearings out there on the web, so I took some. More Google hits for me. This is not actually the headset I will be using, because this is a Campy-style IS42, which is the size my last mechanic said I needed back in '09. Wrong again. I needed an IS41, just like Cane Creek's headset finder program said I needed. Other than the OD of the bearings, the IS41, and IS42 are identical.

Park Tools head cup remover - the RT-1
With the addition of the required 2.5mm finishing spacer between the top of the bearing cap and the bottom of the stem, the 15mm stack height of the high model was too much, so I changed my order to a short, 9mm stack. That opened the door to upgrade to the Cane Cane Creek 110 series, garanteed for 110 years. In the words of Danny DiVito, "Now THAT oughta do it!". Twice the price, but stainless steel and supposedly, bullet-proof, and I NEVER want to find this surprise again.

The removal of the press-in bearing cups - YES, they DO come out, and as one unit - was done by my go-to mechanic at MadCat Bikes on Marconi, Eddy. While I would suggest using the Park Tool fluted headset tool  to knock out the old press-in FSA headset, Eddy used a lot of patience and a screwdriver.

I think this was primarily because neither of us knew if the press-in was supposed to come out, or whether it was bonded into the headtube, or if the upper cup came out and was just butted against the lower press-in, or whether they were all one assembly (bingo).

You can see that at some point in time someone tried to separate the top and bottom part of the press-in with a screwdriver or ice-pick. It's all one assembly buddy. No upper and lower parts to the press-in. Perhaps Calistoga Bike Shop was bending the truth a little selling me the bike as NIB.


Rusty cups. Not a horse race for chestnut bays, just thoroughly shot races.

The FSA press-ins, showing the tapered leading edge and compression holes - or whatever those holes are supposed to do.

Eddy left a few tool marks on the upper, leading edge, but you really have to look to see them. The ratty pry marks happended while my bike was supposedly NIB up at Calistoga Bike Shop

As you can see, the relief groove is desceptive, but NO, this is all one piece, not a seperate upper cup and supporting press-in

A doom with a view

The two press-in cups sitting on a mirror for optimal lighting. It doesn't get worse than this and still turn.

My lower headset as a garden

Potatoes anyone?

Lower headset growing mold. Yeah, I'm just loving this R&R

OK, they're a bit rough, but hey, what's not to like?

The solution. Unfortunately I got the the wrong size, and it's too tall too.

Upside down view of a Cane Creek 40 Series IS42 carbon tall

Upside down, so that's the crown race you're looking at on top in brass. Gotta love those beautiful lip seals Cane Creek uses.

Trial assembly on a chunk of CroMo steering tube from my mtb. Note the male bottomed, flush topped, 2.5mm  finishing spacer that mates with the InterLok machining in the top of the upper bearing cap. They come in 5 colors. None in the package from Universal cycles though, but Cane Creek sent me one for free in the mail and even paid the postage. Now THAT's customer service.

InterLok machining detail showing top of carbon bearing cap, and 2.5 mm alloy finishing spacer

The 2.5mm finishing spacer is turned upside down to show how its machined surface mates with the top of the bearing cap.  A nce view of the O-ring weather seal in light blue here. Just my opinion, but EVERY single spacer in a stack should have such an O-ring. Water running down into bearings is nothing but BAD.

Bottom and top bearing are identical, except for being flipped over so the two 45 degree angles face each other

Close-up of the top cap, its O-ring seal, lip seal, and brass shim. I ordered a pack of 10 .25mm shims which are needed to get the lip seal perfectly positioned to seal onto the face of the headtube. I might have to reface the headtube though, as it is somehow a bit chewed. I will try polishing it with 600 -> 1,500 wet or dry sandpaper.
Close-up of crown race and bottom end of the headset assembly
 Eddy told me his first taps with the screwdriver were meant to turn the press-in to break it loose, and I asked him to support the face of the headtube with a wooden block to prevent the bonded aluminum sub-assembly the press-ins press into from separating, or delaminating from the carbon part of the headtube.

I still need to clean the inside of the headtube a little better, and then do some trial fitting when the new parts arrive from Universal Cycles. Right now I am waiting for them to issue a return authorization, and still have both headsets on my charge card until I get it. Not my fav situation to be in, but I want to get this thing done.

I also ordered a new BB for my FSA Gossomer crank, now that I know what stellar quality seals FSA has. More blog fodder to add to this PART A installment of remove and replace an FSA mindset headset. It also just made sense because I got $10 off the shipping of a $42 part by including it this order.

Bottom line, Universal Bikes is either going to get glowing reviews or a battery acid spew. Fingers crossed, I look forward to a glowing review.

Saturday, November 19, 2011

Dog Days of Winter

Salmon fishing the American River. Taken from the Watt Ave Bridge while scouting a new ride.
For cyclists, it's not the summer, but the winter when we have those dog days with nothing to do, and too little time to do it. I can't believe it's been 10 days since my last post, but for me, there has been a LOT going on. On tap for Techie Tuesday is everything you'll  ever need to know to replace (or re-grease) your headset. Sometime soon a very detailed special on optimal bicycle lighting for seeing and being seen.

I'm sitting here, right now, waiting for my riding clothes to dry, and that reminded me that there is a better, and much more energy efficient way to dry clothes than crank up the heat and turn up the ceiling fan. Centrifugal dryers, like this one, sold by Amazon for $179, may be the perfect Christmas gift for an athletic family.

These leave no minerals, nor detergents behind, and require only a few minutes of finish drying to get completely dry. They also make your clothes last a LOT longer because they don't cook, stretch, tear, chafe, cut, or infuse them with  residual dryer sheet oils.

Rain is on the way, and it has been getting cold, especially on the night rides I have been doing, so the volume of clothing has really spiked. I almost NEVER wash my cycling clothes in a washer, preferring to take them into the shower with me and wash them in anti-bacterial soap in the tub with the help of a strong shower spray.

When I get home from a ride, I don't always want to jump right in the shower, but don't want the clothes to mildew either. I either hang them to dry, or a great trick, and one that will leave your clothes sterile, is to run 4-5 inches of cold water in the tub, and then add a shot glass of bleach.

If it's hot, or you're tired, this allows you to shower and not have to deal with laundry right away. It's also very effective at removing salt from a chamois after a long summer ride.
OXO 1/4 cup measuring cup. Super-accurate angled scales in ounces, tablespoons, and cups. A nice conversation piece for a bartender too
I checked, and the shot glass I use to measure bleach holds the standard 1.5 oz, or 3 tblspns. The standard fabric sensitivity test is 2 tblspns in a quarter cup of water applied to an inside seam for 1 minute and blotted dry. The usual laundry doze is 16 oz in a standard load, which is about 10 gallons of water. I think 4-5" in a tub is 10-12 gallons, so I'm using less than 10% of the usual laundry dose.


BE CAREFUL. You're trying to make swimming pool water, not kill Anthrax. You can leave your clothes to soak this way for days if you want to, but I usually want them done the next morning when I shower.  This treatment is especially great for a thick chamois, which can start to host some nasty bacteria after awhile.

High tech shells have very fragile coatings which shouldn't even see harsh detergents, should never, ever see the inside of a commercial washing machine or dryer, and should not be wrung in any way, shape or form as it will form creases which will displace the coating.

Short of a centrifugal dryer, laying synthetic clothes out flat on a thick towel, rolling the towel up, and twisting it to wring a little, works pretty well. Then just hang under a ceiling fan, or furnace vent, and let air dry.

My long sleeve PI jersey is circa fall 2007, and except for the tear over my shoulder from when I crashed and broke my collarbone, it's only showing wear at the sleeve ends. I like my clothes being available, clean, sterile, durable, and not ruined by someone else's dryer sheet residue.

UPDATE: 7/12/2012
My Voler Vertice bib short has gone very baggy, and the cloth is seriously degraded where the chamios is stitched to the short. This may be due to excessive exposure to bleach. My best guess is it got a couple of "hot shots" while I was searching for the minimum dose that would sanitize my clothes.

One ounce of bleach in 6" min bath water, BEFORE the clothes get into the water, NO overnight soakings, AND a thorough rinsing are recommended. Soaking in 6" of rinse water overnight is just fine. Squishing the water out of the chamois by giving it a "back massage" with your feet is recommended. You want ALL of the bleach out of the thickness of the chamois.